WishList Member includes an integration with Stripe. You can easily set users to be automatically added to a membership level in WishList Member when they purchase. The WishList Member Integration with Stripe allows you to set which content a member can access based on their purchased level. You also have the flexibility to use a popup payment form or a payment form embedded directly onto the page.
All the details are explained below (including screenshots and examples).
Enable Stripe Integration
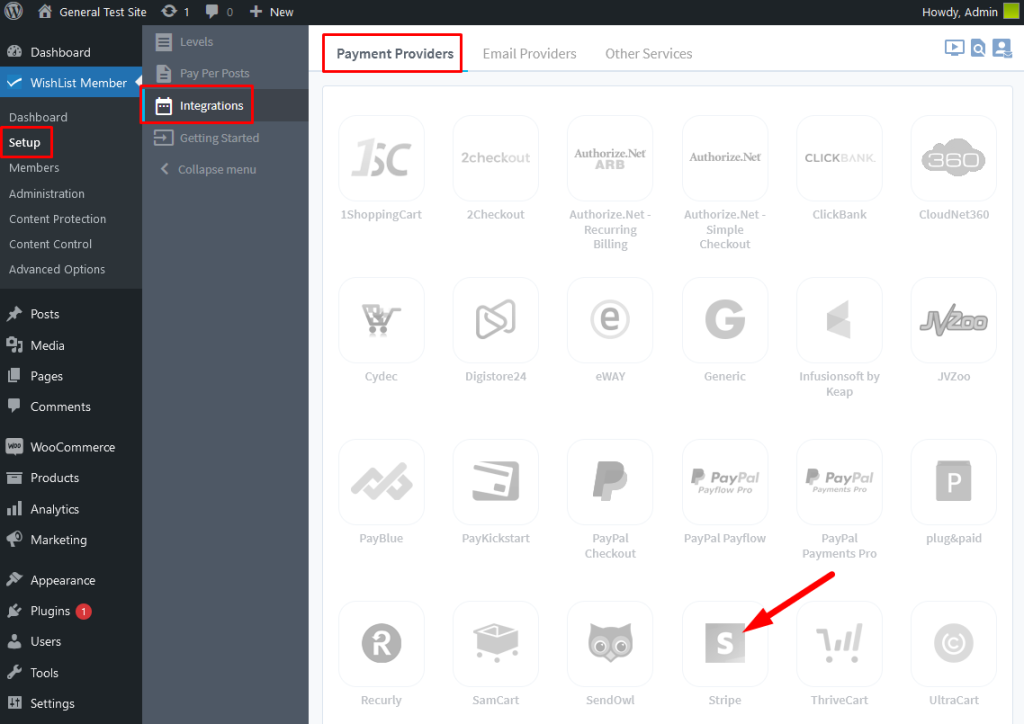
First, you can select and enable the Stripe option in the Setup > Integrations > Payment Providers section of WishList Member.

—

—
The Settings tab will appear and the API Status will show as “Not Configured”. This is because WishList Member and Stripe need to be connected using the quick process explained below.
Connecting WishList Member and Stripe
Click the blue Configure button.

—
The Stripe Configuration popup will appear and will display the API tab.
Click the blue Connect with Stripe button.

—
You will be directed to a page to login with your WishList Member account. Enter the username and password you use to login to the WishList Member Customer Center and click the Submit button.

—
You will be directed to the Stripe site and a form to connect WishList Member and Stripe will be displayed. Enter your Stripe account email address and password into the corresponding fields and click the Log in button.

—
You may see a message stating a verification code has been sent to your mobile device. If so, enter that verification code into the corresponding field.

—
A message asking you to select the Stripe account you would like to connect with WishList Member will appear. Select the desired account and click the Connect button.

—
A message stating you are returning to WishList Member will briefly be displayed.

—
You will be directed back to WishList Member and the API Status will show as “Connected”. The Stripe account connected to WishList Member will also be displayed in the Stripe Configuration popup. Click the Save & Close button.

—
WishList Member and Stripe are now connected and the integration process can continue.
—
General Settings
There are general settings related to currency, support email, etc. Click the blue Configure button again and select the Settings tab in the Stripe Configuration popup.

—

—
The following settings are available for configuration.
Primary Currency. Set the currency type for payments. This is the currency users will pay during registration.
Support Email. Set the email address to receive support requests related to purchases.
Cancellation Redirect. Set the page to be displayed to a user who cancels during the purchase process.
Immediately cancel Stripe Subscription and Level in WishList Member when the user cancels their subscription via the Stripe Profile Shortcode. If enabled, the Stripe Subscription will be cancelled in Stripe and the Level access will be cancelled in WishList Member if a user cancels using the option on the form displayed when using the Stripe Profile Shortcode. The Stripe Profile Shortcode can be created/inserted using the WishList Member Shortcode Inserter or a Shortcode Block.
Allow Stripe to Automatically Calculate Tax on Subscriptions. If enabled, Stripe will calculate the appropriate Tax for a Subscription.
Click the Save or Save & Close button when finished.
—
Payment Form
There are settings related to the payment form popup that will appear when a user clicks to purchase on the live site. The Payment Form tab controls the appearance of that form.
Click the blue Configure button again and select the Payment Form tab in the Stripe Configuration popup.

—

—
The following settings are available for configuration.
Heading Text. The top of the popup form will display the text in this field. The default message is: Register for %level. Note: %level will be replaced by the name of the membership level on the live site. Example: Register for Gold.
Heading Logo. An image can be shown on the top of the popup form.
Button Label. The button that is inserted on the page. The popup payment form will appear when a user clicks this button. The default message is: Join %level. Note: %level will be replaced by the name of the membership level on the live site. Example: Join Gold.
Panel Button Label. The button within the popup payment form. A user clicks this button to pay. The default message is: Pay.
Click the Save & Close button when finished.
—
Product Settings
A Products tab appears when WishList Member and Stripe are fully connected. You can now configure product settings for the desired membership levels and/or pay per posts.

—
Click a membership level or pay per post to edit.
The Editing Stripe Product for Level Name popup will appear.

—
The following settings are available for configuration.
Stripe Plan. A Stripe Plan will charge the user based on the scheduled payments (recurring payments) configured in Stripe.
OR
One Time Payment (Custom Pricing). A One Time Payment will charge the user a one time payment (non-recurring payment).
Select Stripe Plan(s). If the Stripe Plan option is selected above, this dropdown is populated with the Stripe Plans from the connected Stripe account. Select the desired Stripe Plan for this Level.
Cancel the user's Stripe Subscription when the membership level is cancelled in WishList Member. If the Level is cancelled for a user in WishList Member, cancel the Stripe Plan within Stripe.
Allow Proration for this Level. If enabled, users can upgrade to this Level through Proration. More details available in the Stripe – Prorated Payments article.
Note: The Remove from Previous Level After Prorated setting shown in the screenshot example and mentioned below only appears if the Allow Proration for this Level setting is enabled.
Remove from Previous Level after Prorated. If enabled, the user will be removed from the Previous Level after they have paid to upgrade through Proration. More details available in the Stripe – Prorated Payments article.
Click the Save & Close button when finished.
—
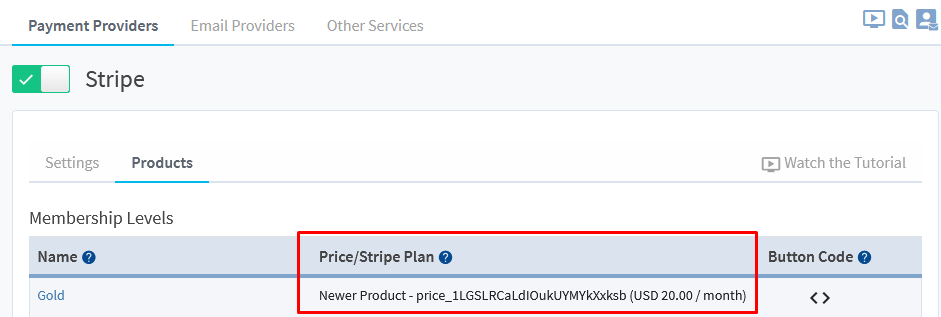
The two screenshot examples below show the Gold level set to use a Stripe Plan. It is configured to cost $20 a month based on the selected Stripe Plan. It will also cancel the user's Stripe Subscription if the membership level is cancelled in WishList Member.
The proration options have also been enabled.

—

—
Selling Access (using Connected Membership Level)
The last step is adding the purchase form to your site. A shortcode is automatically generated for each configured membership level. This means you can insert a purchase button onto any page or post on your site.
This can be done by copying the Shortcode provided in the Button Code column in the Integrations section or by using the WishList Member Shortcode Inserter.
A Popup Payment Form or an On Page Payment Form can be used to add a Stripe payment form to your site and both options are explained in more detail below.
Button Code
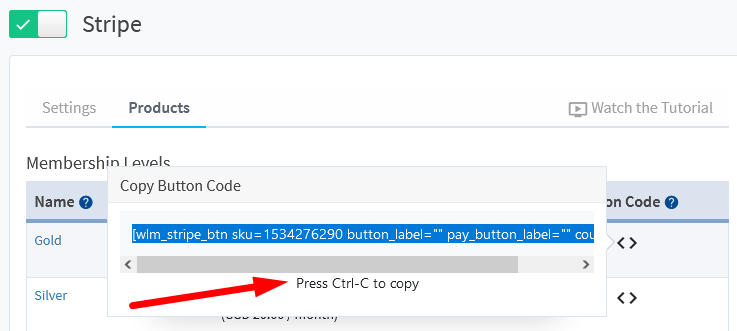
Click the icon in the Button Code column of the Stripe Integration section within WishList Member.

—
The Copy Button Code popup will appear and the Shortcode can be copied and pasted onto any page or post.

—
Below is a screenshot example of the Payment Button Shortcode pasted into a page. This option will display the Purchase Button for that membership level on the live site.

—
Shortcode Inserter
The WishList Member Shortcode Inserter can be accessed using a Classic Block through the Gutenberg editor or by using the Shortcode Creator located on the WishList Member Dashboard.
In the example below, the Classic Block is used in the Gutenberg editor to insert the Stripe purchase form.
Insert the Classic Block and click on the blue WishList Member Shortcode Inserter button.
Select Integrations > Stripe Integration > Stripe Registration Button.

—
The Shortcode Creator > Stripe Registration Button popup will appear and you can use the available options to create a Stripe Popup payment form or a Stripe On Page payment form.

—
Select a membership level from the Membership Level dropdown and additional settings will be displayed. The example below shows the Gold level has been selected.

—
Pay Button Label. The label of the button that is inserted on the page. The default message is: Pay.
Show in Popup Window. If Yes is selected, a payment button will be displayed and a popup payment form will appear when that button is clicked. If No is selected, an on page payment form will be automatically inserted directly on the page.
Popup Button Label. Only appears if the “Show in Popup Window” option is set to Yes. The popup button label default message is: Join %level. Note: %level will automatically be replaced with the name of the selected membership level on the live site. Example: Join Bronze.
Enable Coupon Code. If Yes is selected, a field to enter a coupon code will be included on the payment form.
Shortcode Preview. A preview of the shortcode is displayed and changes in real time based on the options selected. The shortcode can also be copied from this section and pasted into any page or post.
—
Popup Payment Form Example
The screenshot example below shows a Stripe button for the Gold level that will be displayed using the Popup Payment Form option and will include the coupon code field. Click the Insert Shortcode button and the shortcode will be inserted onto the page.

—
The shortcode will appear in the edit page section. Save/Update the page to add the payment form to the page.

—
You can add any additional text or design elements to your sales page. The example below shows only placeholder text and the shortcode inserted and displaying the Join button on the live site. Clicking the button will display the payment form popup.

—
Below is a screenshot example of the payment form popup that appears when the Join button is clicked.

—
The user can fill in the form and make the payment. This will result in the user being granted access to the Gold level.
On Page Payment Form Example
The screenshot example below shows a Stripe button for the Gold level that will be displayed using the On Page Payment Form option and will include the coupon code field. Click the Insert Shortcode button and the shortcode will be inserted onto the page.

—
The shortcode will appear in the edit page section. Save/Update the page to add the payment form to the page.

—
The example below shows the page displaying the On Page Payment Form. The form appears directly on the page and the user can fill out the displayed fields.

—
The user can fill in the form and make the payment. This will result in the user being granted access to the Gold level.
—
Additional Stripe Integration Articles
The Stripe – Prorated Payments Knowledge Base article has more information (including screenshots) on accepting prorated payments for membership levels.
The Stripe Integration – Profile Page Knowledge Base article has more information (including screenshots) on displaying a Profile Page for members.
The Stripe – Edit Payment Form Knowledge Base article has more information (including screenshots) on editing the look of the payment form.
The CSS – Registration Form / Buttons Styling Knowledge Base article has more information about styling your registration button/form.
