
Members will be added to your site if they register to join a membership. You also have the option to manually add new members at any time. Either method can be used to provide access to members and once they become a member, you have the ability to edit their member account. This means you can quickly adjust their access, login info, and more.
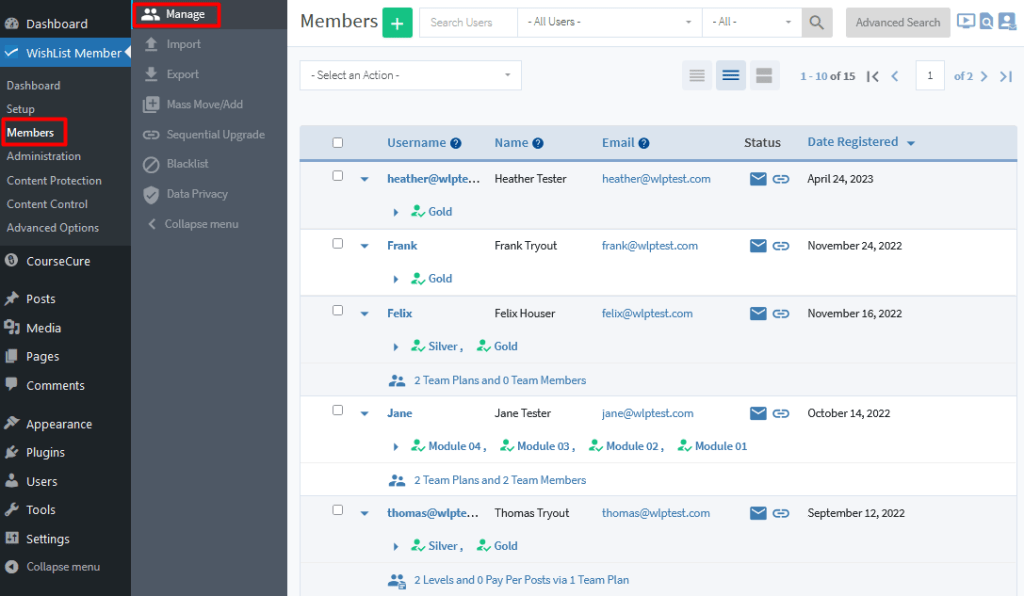
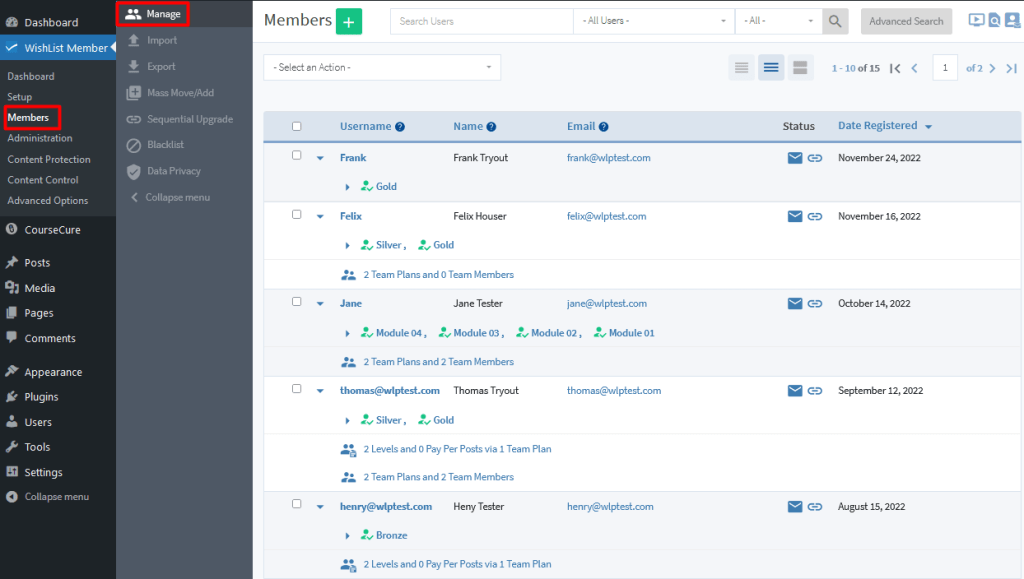
A list of your members is displayed in the Members > Manage section in WishList Member.
—
You can edit any member account by clicking their username or the corresponding Edit (pencil) icon that will appear when mousing over the member on the Members list.

—
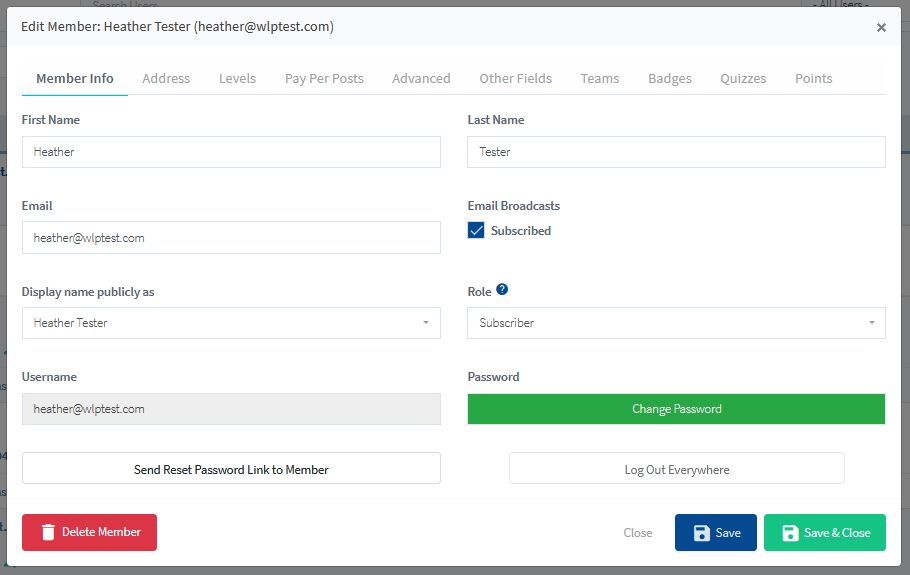
The Edit Member popup will appear and you can view or edit any of the available fields in each of the tabs. Once you click the Save or Save & Close button, any edits will be applied. The red Delete Member button can be used to delete the member.
We will run through each of the tabs in the Edit Member popup in more detail below.
—
Edit Member – Member Info
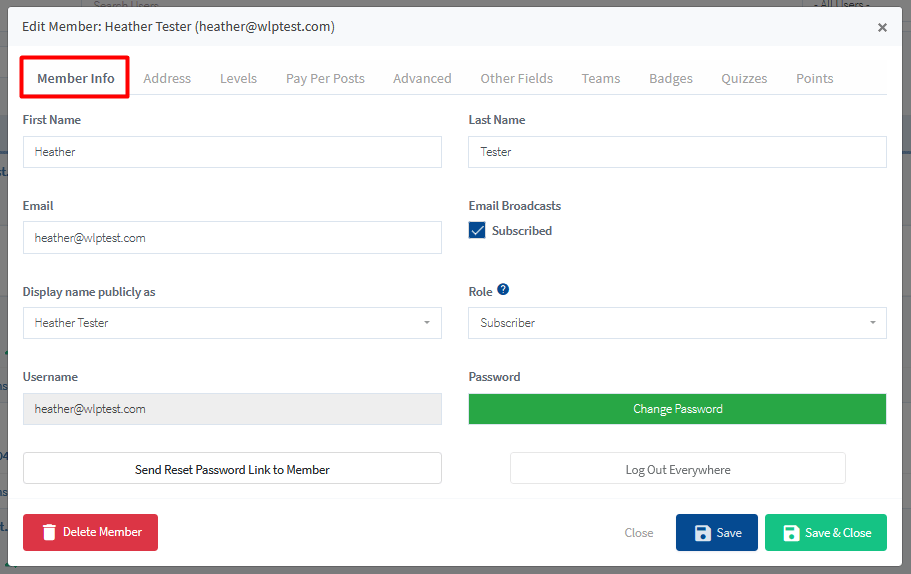
These options are related to general member information including name, email address, WordPress role, username, password and more. More details on each option are provided below.
—
First Name. The first name of the member. This can be edited at any time.
Last Name. The last name of the member. This can be edited at any time.
Email. The email address of the member. This can be edited at any time. Keep in mind, changing the member email address will mean any future email notifications will be sent to the new email address.
Email Broadcasts. If enabled, the member would receive any emails sent using the WishList Member Email Broadcasts feature.
Display name publicly as. The name that will appear on the live site in any cases where the member name is displayed. The dropdown can be used to view the available names that can be displayed publicly. As an example, this can be used if you only want the member's first name to be displayed.
Role. The WordPress Role assigned to the member. This is typically set to Subscriber but it can be changed.
Username. The username of the member. This cannot be edited because WordPress doesn't allow for usernames to be changed once they have been set.
Password. The “Change Password” button can be used to generate a new password for the member. It will display a strength of password indication message if used.
Send Reset Password Link to Member. The “Send Reset Password Link to Member” button can be used to send an email to the member with a link to reset their password. The member can use that secure link to reset their password.
Log Out Everywhere. The “Log Out Everywhere” button can be used by the site admin to log the member out of the site on any devices they may be logged in through.
Edit Member – Address
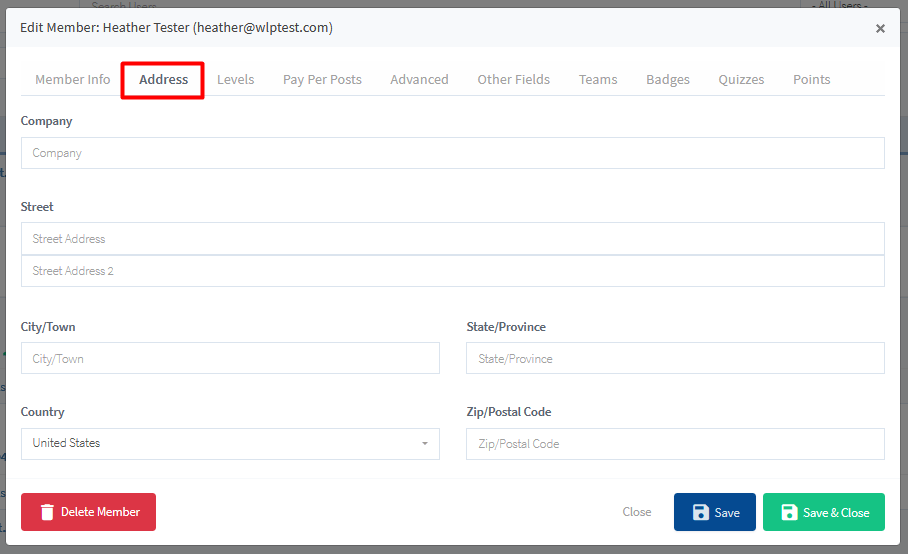
These options are related to the member address information including company, street address, city/town, state/province, country and zip/postal code. These fields are optional so they may appear blank for your members. More details on each field are provided below.
—
Company. The company name of the member. This can be edited at any time.
Street. The street address of the member. This can be edited at any time. Keep in mind, there are two fields for street address. This can be used for members who have an apartment or unit number.
City/Town. The city/town of the member. This can be edited at any time.
State/Province. The state/province of the member. This can be edited at any time.
Country. The country of the member. This can be edited at any time.
Zip/Postal Code. The zip/postal code of the member. This can be edited at any time.
—
Edit Member – Levels
These options are related to the membership level(s) assigned to a member. A Levels sub tab and a History sub tab are available with corresponding member information.
Edit Member – Levels – Levels Sub Tab
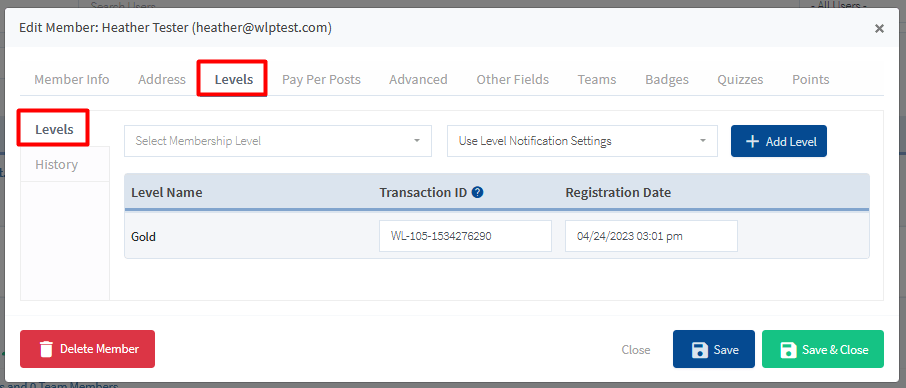
The membership levels assigned to the member will be displayed along with any transaction IDs and Registration Dates. Additional membership levels can also be added to the member account in this section of WishList Member.
This screenshot example shows a member with the Gold membership level assigned to their account. This means the member can access any content assigned to the Gold membership level.
—
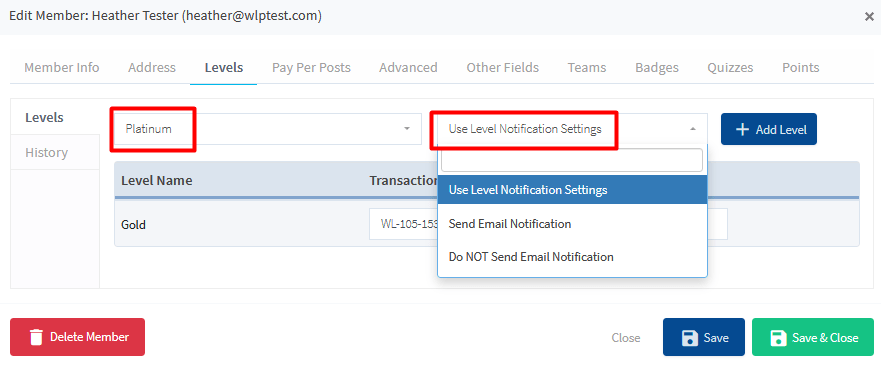
The “Select a Membership Level” dropdown can be used with the “Level Notification Settings” dropdown to add a new level to the member.
This screenshot example shows the member will be added to the selected Platinum level and the Notification Settings that are set for that level will determine if the New Member Registration email will be sent to the member or not. You also have the option to simply select if you want to send that notification email or not by choosing Send Email Notification or Do NOT Send Email Notification from that dropdown.
—
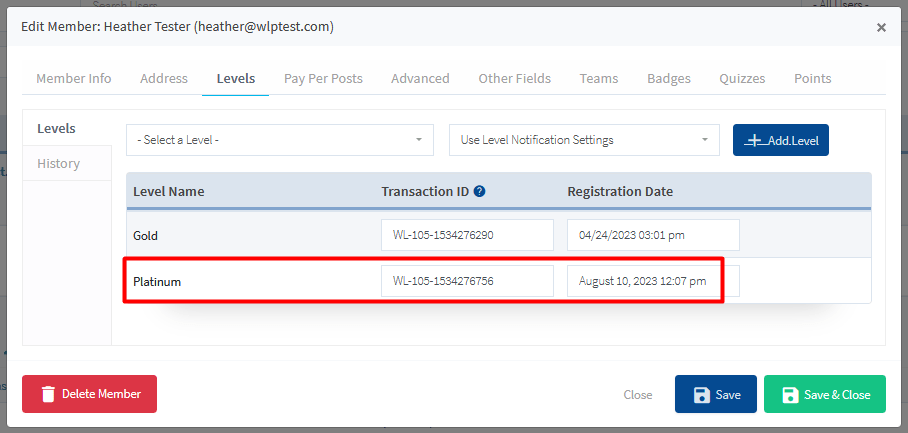
Click the blue Add Level button and the level will be assigned to the member and it will be displayed on the Levels list.
—
Transaction ID. A Transaction ID is assigned to a membership level during account creation/registration. The format of the Transaction ID will be based on the integrated payment provider. In many cases, the Transaction ID ties the member to a payment in the payment provider. If no integration with a payment provider is set up or the level is manually assigned to the member, the Transaction ID format will be the standard WishList Member format. Example: WL-0-0000000000
Registration Date. The date the member registered for the level or the date the level was assigned to the member.
—
Edit Member – Levels – History Sub Tab
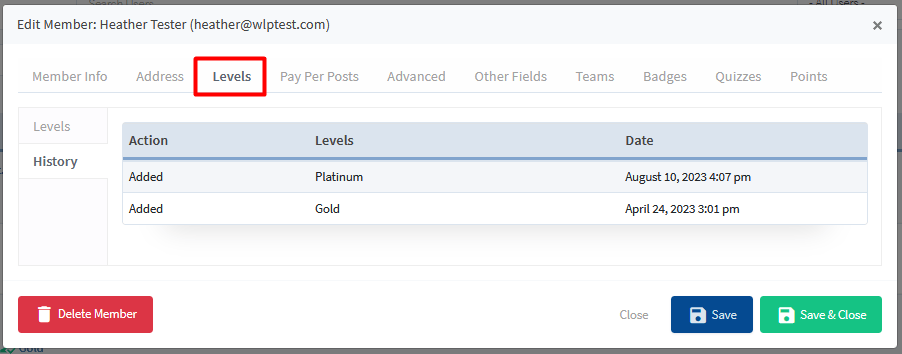
The History section displays when the member was added to a level, removed from a level, cancelled from a level, etc.
The screenshot example below show a member who was added to the Gold membership level on April 24th and added to the Platinum membership level on August 10th.
—
Edit Member – Pay Per Post
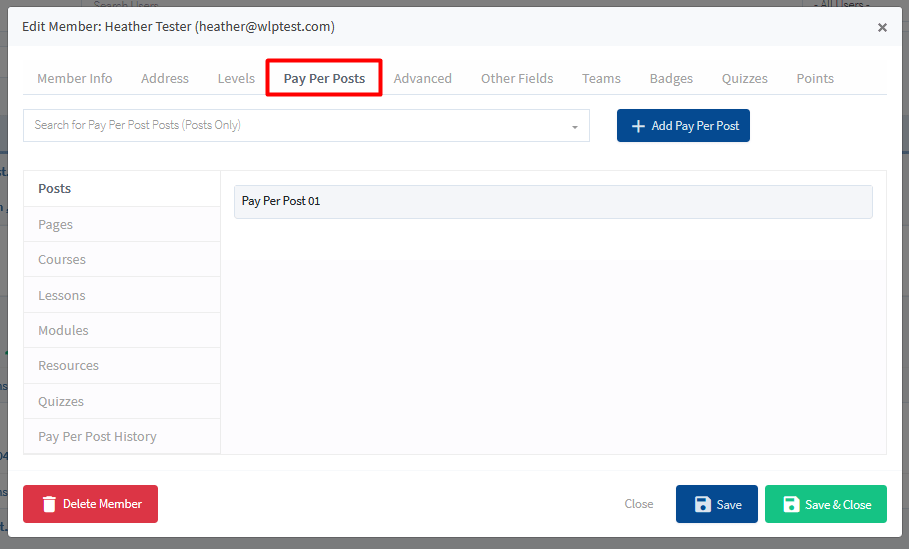
These options are related to any Pay Per Posts assigned to a member. There are sub tabs in this section with corresponding member information for Pages, Posts, Pay Per Post History and any CourseCure related Pay Per Posts (Courses, Lesson, Quizzes, etc.).
—
Edit Member – Pay Per Post – Posts Sub Tab
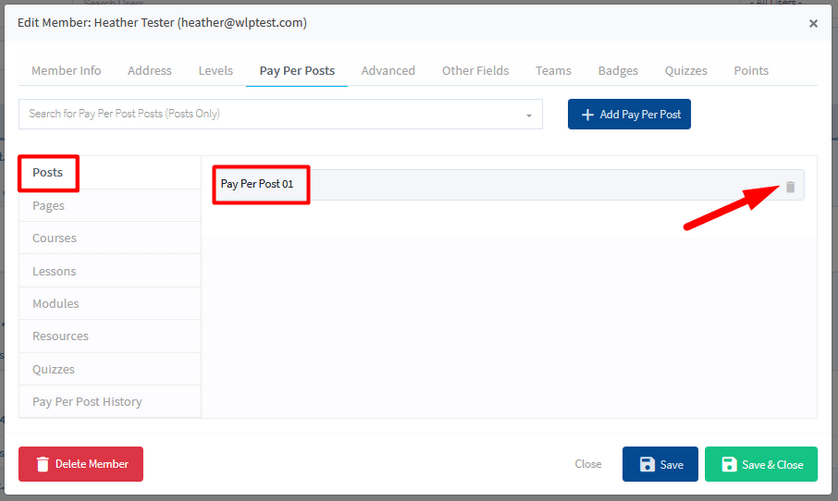
The current posts assigned as Pay Per Posts to the member will be displayed. Additional Pay Per Posts can also be added to the member account in this section of WishList Member.
This screenshot example shows a member with the post named “Pay Per Post 01” assigned to their account. This means the member can access that specific post on the live site. You also have the option to delete the Pay Per Post from the member account by hovering your mouse over the Pay Per Post and using the Trash icon.
—
Edit Member – Pay Per Post – Pages Sub Tab
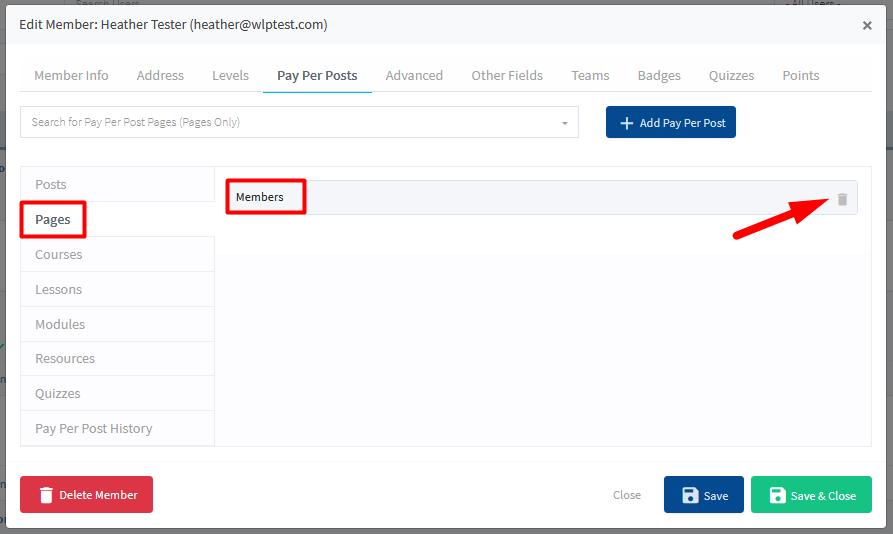
The current pages assigned as Pay Per Posts to the member will be displayed. Additional Pay Per Posts can also be added to the member account in this section of WishList Member.
This screenshot example shows a member with the page named “Members” assigned to their account. This means the member can access that specific page on the live site. You also have the option to delete the Pay Per Post from the member account by hovering your mouse over the Pay Per Post and using the Trash icon.
—
Edit Member – Pay Per Post – CourseCure Related Content Sub Tabs
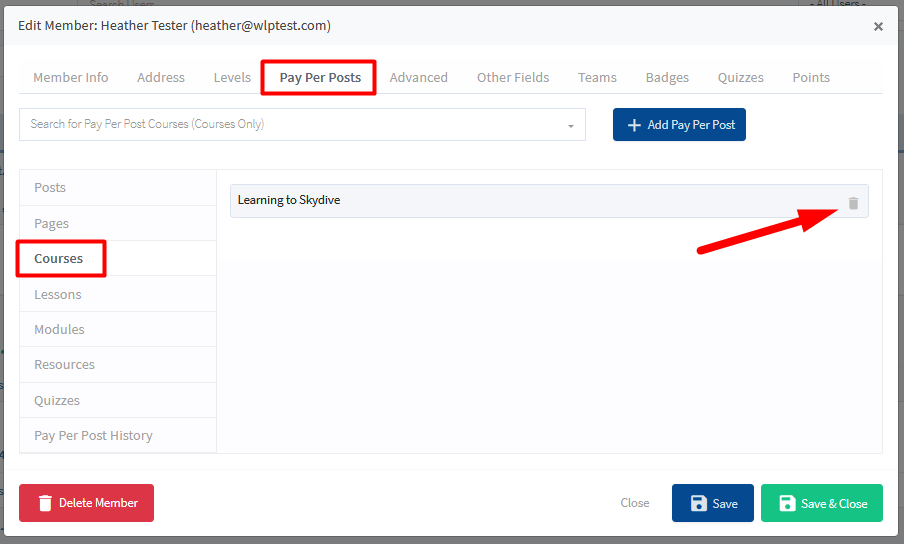
If you are using any CourseCure functionality, the current CourseCure content assigned as Pay Per Posts to the member will be displayed. This includes Courses, Quizzes, etc. Additional Pay Per Posts can also be added to the member account in this section of WishList Member.
This screenshot example shows a member with the course named “Learning to Skydive” assigned to their account. This means the member can access that specific course on the live site. You also have the option to delete the Pay Per Post from the member account by hovering your mouse over the Pay Per Post and using the Trash icon.
—
Edit Member – Pay Per Post – Manually Add a Pay Per Post
You can manually add a Pay Per Post to a member account in any of the sub tabs. This includes Posts, Pages and any CourseCure options you might be using.
This screenshot shows the Posts sub tab and the “Search for Pay Per Posts (Posts Only)” dropdown. You can search for any posts you have set as Pay Per Posts in this field and add them to the member account using the blue Add Pay Per Post button.

—
Edit Member – Pay Per Post – History
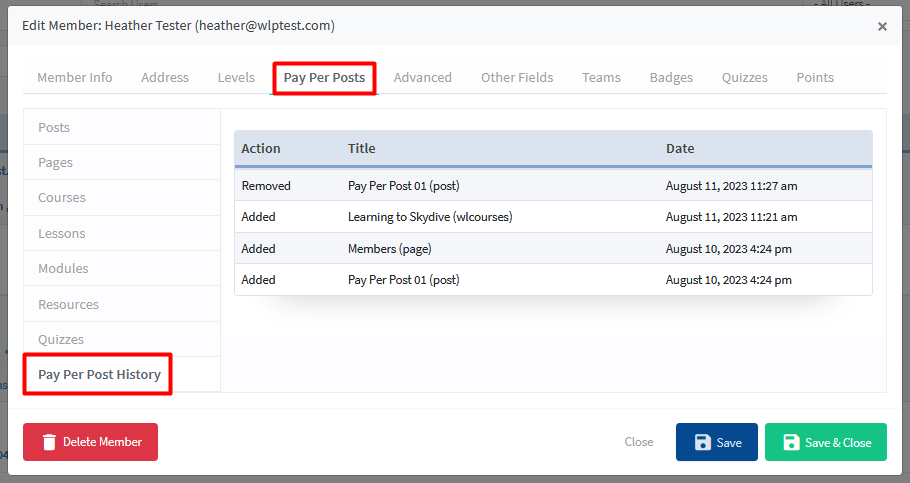
The History section displays when a Pay Per Post was added to the member account or a Pay Per Post was removed from a member account.
The screenshot example below shows a member with three Pay Per Posts added to their account and one Pay Per Post removed from their account along with the corresponding dates of those actions.
—
Edit Member – Advanced
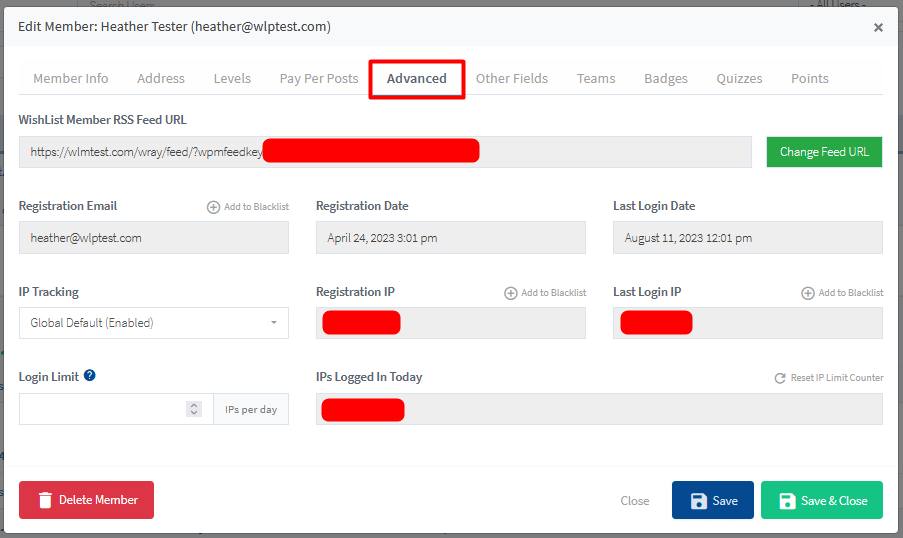
These options are related to advanced member settings including RSS feed, registration date, IP tracking, last login IP, login limit and more. More details on each option are provided below.
—
WishList Member RSS Feed URL. The unique RSS feed for the member. The green “Change Feed URL” button can be used if you want to create a new unique RSS feed for the member.
Registration Email. The email address used during the member registration. This email address cannot be edited in this section as it can be edited in the Edit Member – Member Info tab.
Registration Date. The date of the member registration. This date is based on the first time the member was added to the site and cannot be edited in this section as it can be edited in the Edit Member – Levels tab. If a member has more than one membership level assigned to them, their Registration Date is the date they were added to their first membership level.
Last Login Date. The date the member last logged into the site.
IP Tracking. The Global Default settings for IP Tracking are found in the Members > Data Privacy > Settings section in WishList Member. The IP Tracking setting can be left as default or you can select to enabled or disable IP tracking for the specific member.
Registration IP. The IP address of the member at the time of registration. There is an option to “Add to Blacklist”. Using that option would add the IP address to the blacklist and prevent anyone with that IP address from registering to the site.
Last Login IP. The IP address of the member at the time of their most recent login to the site. There is an option to “Add to Blacklist. Using that option would add the IP address to the blacklist and prevent anyone with that IP address from registering to the site.
Login Limit. The default login limit for all members is set in the Advanced Options > Logins > Settings section in WishList Member. The login limit for an individual member can be changed for the specific member. This setting controls the total number of IPs a member can login with each day.
Special Values can be used in this field.
0 or Blank: Use the Default Login Limit for the member set in Advanced Options > Logins > Settings section in WishList Member.
-1: No Login Limit set for the member.
IPs Logged In Today. The IP address the member logged in from today (if applicable). There is an option to “Reset IP Limit Counter”. Using that option would reset the number of IPs the member has logged in from.
Edit Member – Other Fields
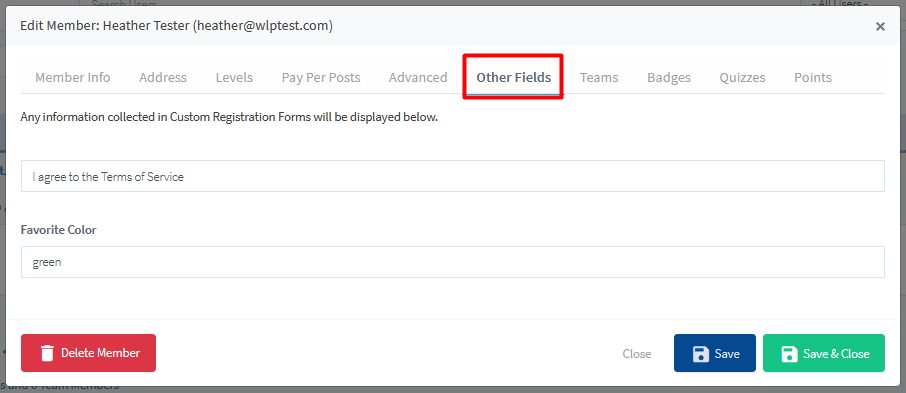
These options are related to any custom fields that may have been applied to a custom registration form. Custom registration forms are optional so this section would appear blank if a custom registration form is not being used. If a custom registration form was used by the member during registration, the corresponding additional fields would appear.
In this screenshot example, a custom registration form was used to register and included two additional fields. A request to agree to Terms and Service and a question asking the member to enter their favorite color. The member agreed to the Terms of Service and set green as their favorite color in this case.
—
Edit Member – Teams
These options are related to any Team Accounts associated to a member. There are sub tabs in this section with corresponding member information for Team Plans, Team Members and Teams Joined.
—
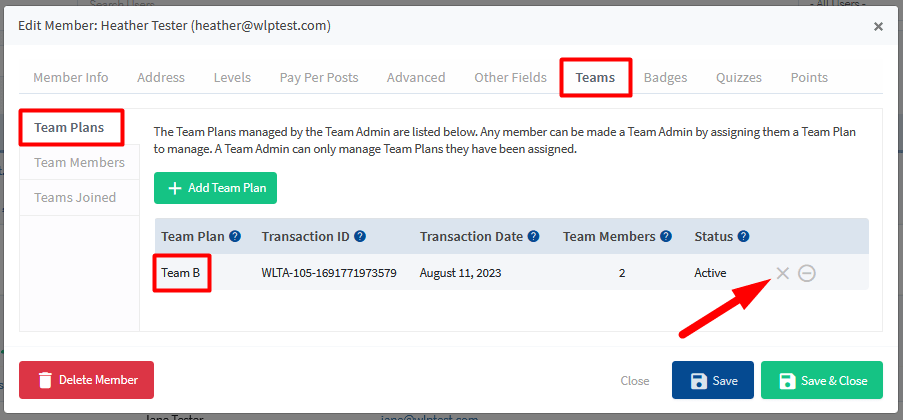
Edit Member – Teams – Team Plans Sub Tab
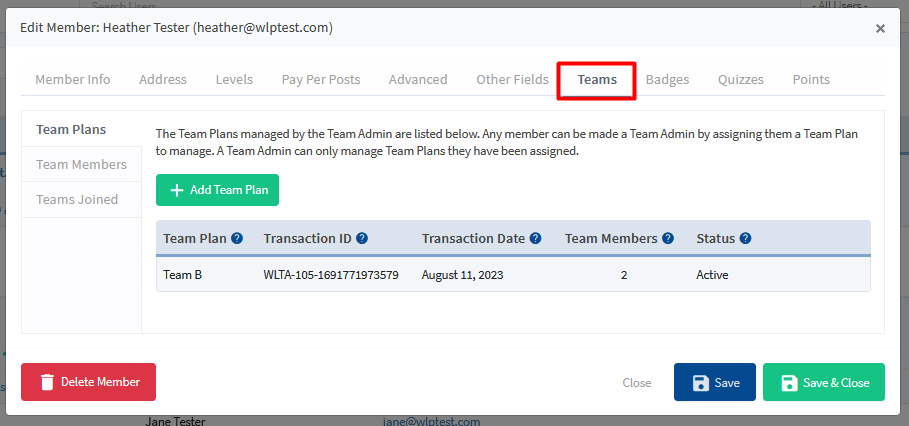
The current Team Plans managed by the member will be displayed. Additional Team Plans can also be added to the member account in this section of WishList Member.
This screenshot example shows a member with the Team Plan named “Team B” assigned to their account. This means the member is a Team Admin for that Team Plan and can manage it accordingly. You also have the option to cancel/uncancel or remove the Team Plan from the member account by hovering your mouse over the Team Plan and using the displayed icons.
—
Team Plan. The name of the Team Plan.
Transaction ID. The unique Transaction ID tied to the transaction of adding a Team Plan to a Team Admin.
Transaction Date. The Transaction Date tied to the transaction of adding a Team Plan to a Team Admin.
Team Members. The total number of members a Team Admin can add to the Team Plan.
Status. The current Status of the Team Plan. Status can be Active or Cancelled.
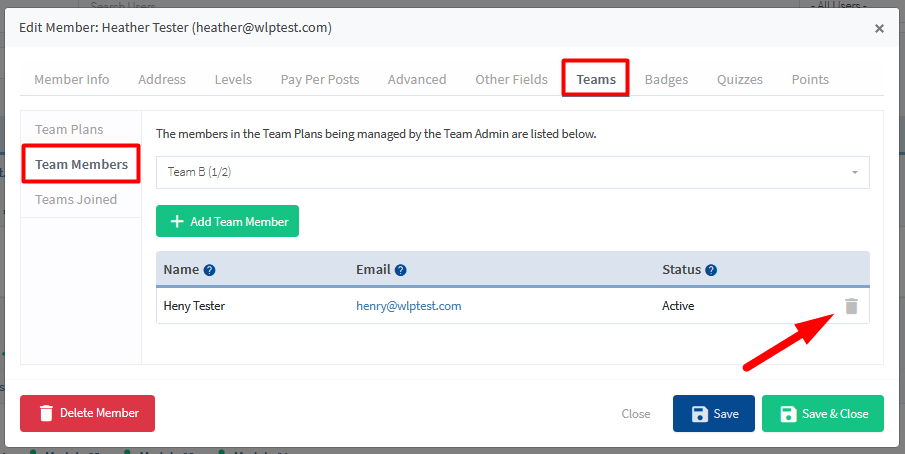
Edit Member – Teams – Team Members Sub Tab
The current Team Members managed by the member (as the Team Admin) will be displayed. Additional Team Members can also be added to the Team Plan in this section of WishList Member.
This screenshot example shows a member (as the Team Admin) with the Team Plan named “Team B” selected from the Team Plans dropdown. This means the member (as the Team Admin) can add members to the Team Plan. In this case, a member named Henry Tester has been added to the Team Plan. You also have the option to remove the member from the Team Plan by hovering your mouse over the member and using the Trash icon.
—
Name. The name of the Team Member.
Email. The email address of the Team Member.
Status. The current status of the Team Member. The status can be Active or Invited.
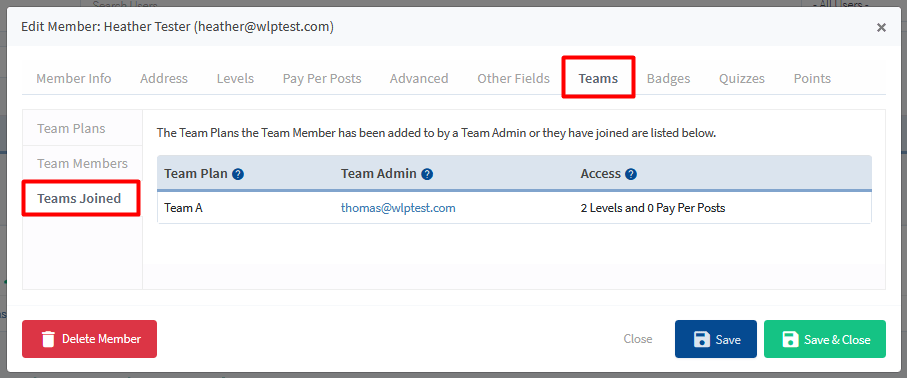
Edit Member – Teams – Teams Joined Sub Tab
The current Teams the member has joined will be displayed. These are Team Plans the member has been added to/joined.
This screenshot example shows a member who has joined the Team Plan named “Team A”. This means the member is a part of that Team Plan and can access the corresponding content accordingly. In this case, the member has joined Team A and that team is managed by the Team Admin with email address [email protected].
—
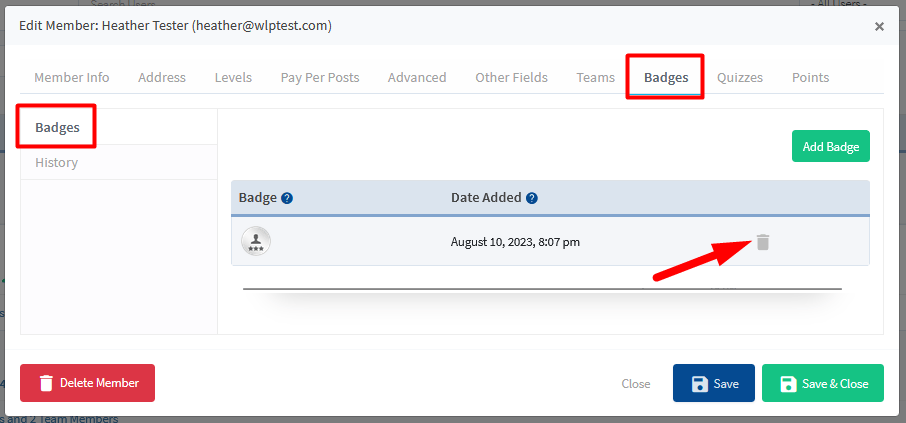
Edit Member – Badges
If you are using the Badges functionality in CourseCure, these options are related to any Badges assigned to a member. There are sub tabs in this section with corresponding member information for Badges and History. Additional Badges can also be added to the member account in this section of WishList Member.
This screenshot example shows a member with a Badge assigned to their account. This means the member can view that specific Badge on the live site. You also have the option to delete the Badge from the member account by hovering your mouse over the Badge and using the Trash icon.
—
Edit Member – Badges Sub Tab – Manually Add a Badge
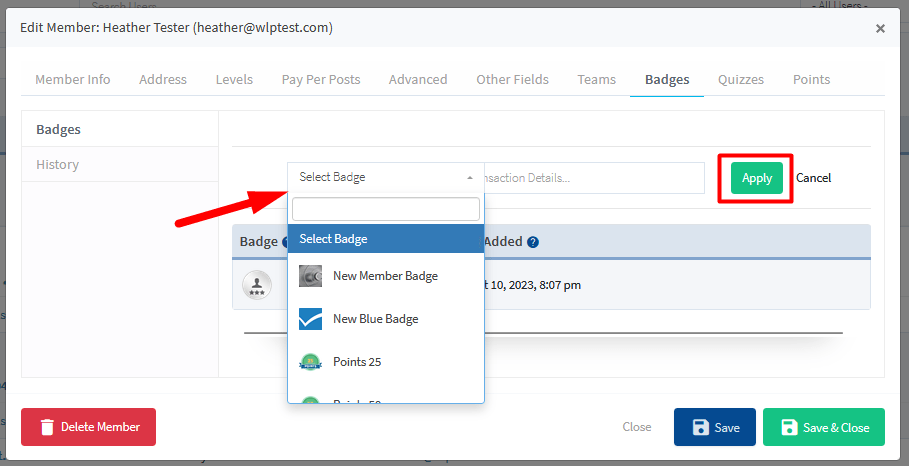
You can manually add a Badge to the member account by clicking the green Add Badge button. This will display the “Select Badge” dropdown and you can select or search for any available Badges. The green Apply button can be used to add the Badge to the member account.
—
Edit Member – Badges – History Sub Tab
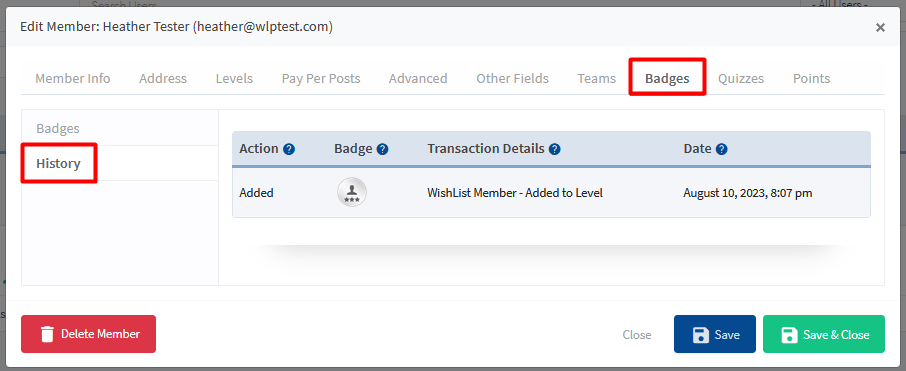
The History section displays any time a Badge was added to the member account or a Badge was removed from a member account.
The screenshot example below shows a member with a Badge added to their account along with the corresponding transaction details and date of that action.
—
Edit Member – Quizzes
If you are using the Quizzes functionality in CourseCure, these options are related to any Quizzes the member has taken. The corresponding information for each quiz taken will be displayed including score, passing score, correct or incorrect answers, date and more.
This screenshot example shows a member who took the Quiz named “Skydiving Quiz” and the details related to the answers they provided while taking the quiz.

—
Edit Member – Points
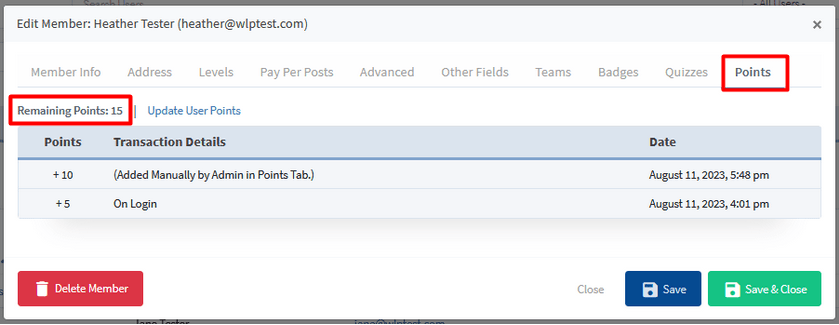
If you are using the Points functionality in CourseCure, these options are related to any Points assigned to a member. Additional Points can also be added to the member account or Points can be subtracted from the member account in this section of WishList Member.
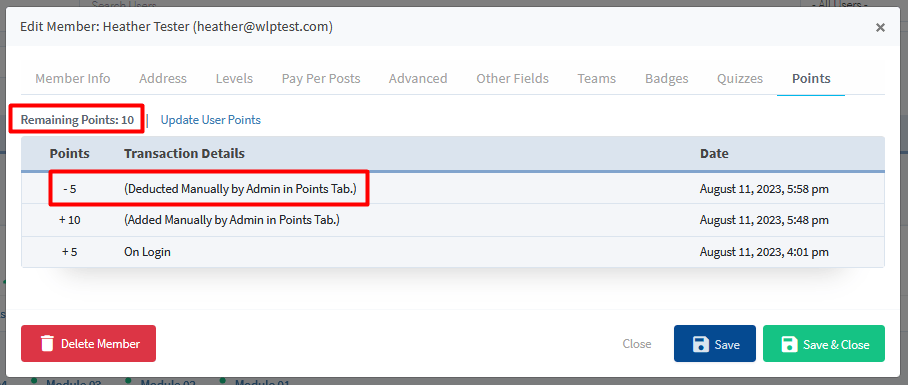
This screenshot example shows a member with a total of 15 Points. The member had 5 Points added based on a Points Rule related to logging into the site and also had 10 Points manually added by the site admin.
—
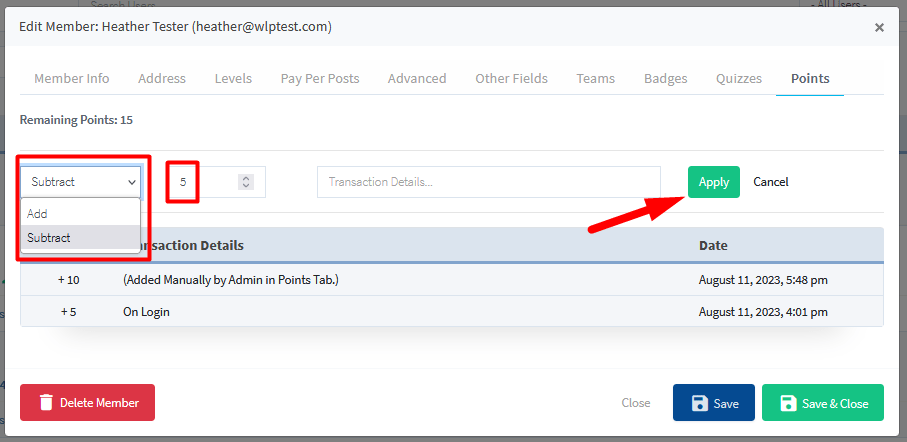
You can manually add Points to the member account or subtract Points from the member account using the “Update User Points” option. This will display the “Add/Subtract” dropdown and you can select how you you would like to update the Points total for the member.
This screenshot example shows 5 Points set to be Subtracted from the Points Total.
—
Clicking the Apply button will apply this action to the Points Total for the member.
—
Edit a Member on the Members List
You also have the option to make some quick edits to a member account directly on the list of members in the Manage > Members section in WishList Member.
—
This includes adding a level, removing a level, cancelling a level, and more. You can also adjust the status of the Email Broadcasts or Sequential Upgrade for the member. These are a just few of the options you can apply to a member on the Members list and you can get all the details including screenshots and examples in the Manage Members Overview Knowledge base entry.
