
WishList Member includes an integration with ResponseSuite. This allows you to automatically provide or revoke member access in WishList Member based on specific settings you apply to a survey in ResponseSuite. You can create automation to occur based on the way users answer the survey questions. This can include adding members to a membership level depending on how they respond to certain questions. Or removing them from a membership level if they provide a different answer. These are just a couple sample ideas. All the details are explained below (including examples and screenshots).
Enable ResponseSuite Integration
First, you can select and enable the ResponseSuite option in the Setup > Integrations > Other Services section of WishList Member.

—

—
The Settings tab will appear and three fields with three pieces of information will be displayed.
- WordPress URL
- Digest Auth Username
- API Key / Digest Auth Password
The WordPress URL and API Key are the pieces of information needed to create the connection between WishList Member and ResponseSuite.

—
Connecting WishList Member and ResponseSuite
The WordPress URL and API Key from WishList Member can be copied and pasted into the corresponding fields in the Integration Setup > Membership > WishList Member section on the ResponseSuite site.
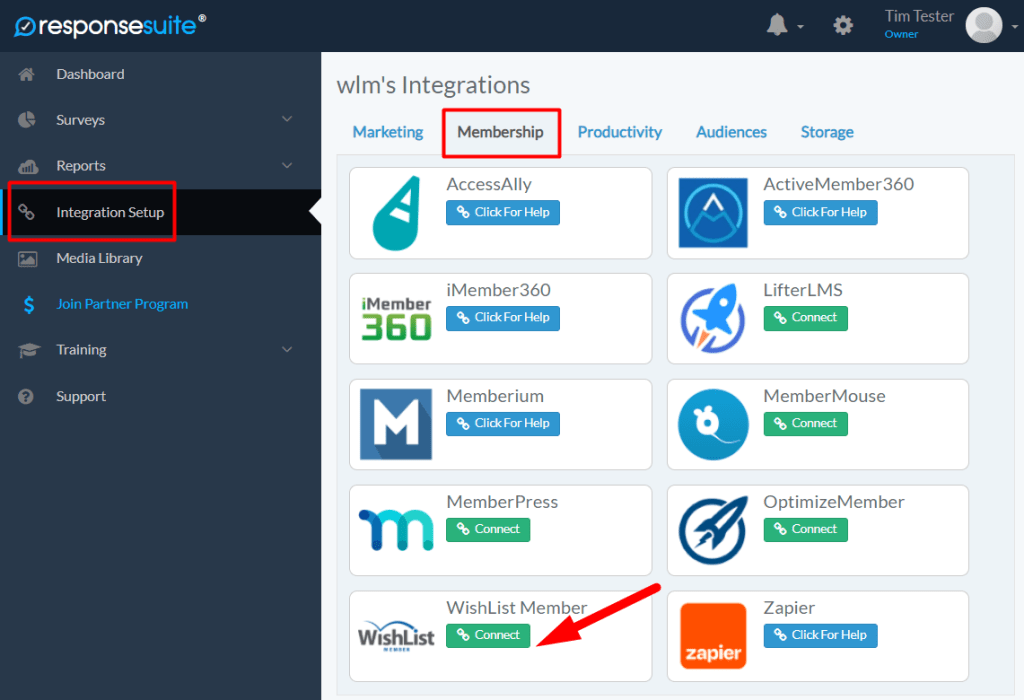
—

—
You can click the brown “Authorize” button once the two fields are filled in.

—
The status will appear as “Connected” as shown in the screenshot below.
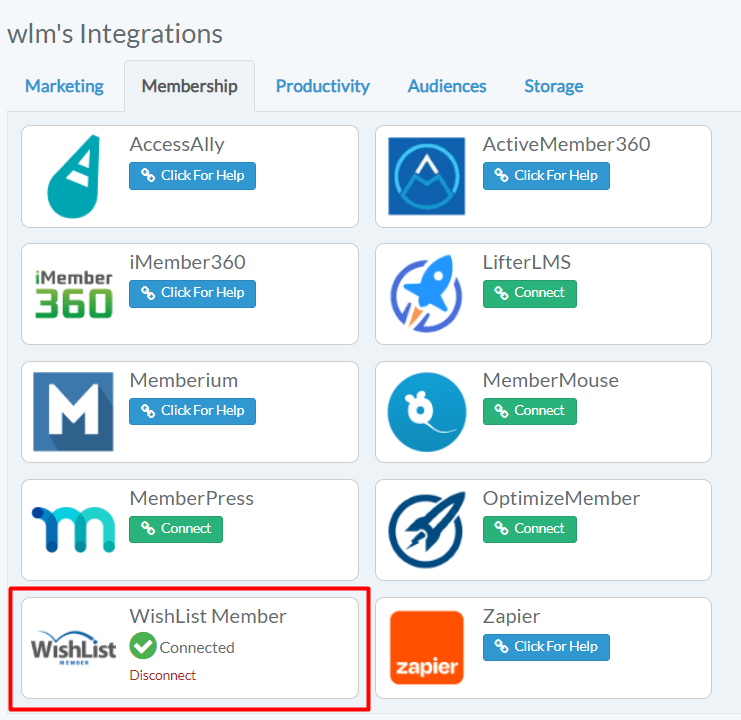
—
WishList Member and ResponseSuite are now connected and the integration process can continue.
Integrating ResponseSuite Surveys with Membership Levels in WishList Member
You can create a survey as you typically would in the Surveys > Create section of ResponseSuite. It can include any questions you would like to ask the participants. A survey can be integrated with WishList Member while it is being created or you can integrate an existing survey with WishList Member.
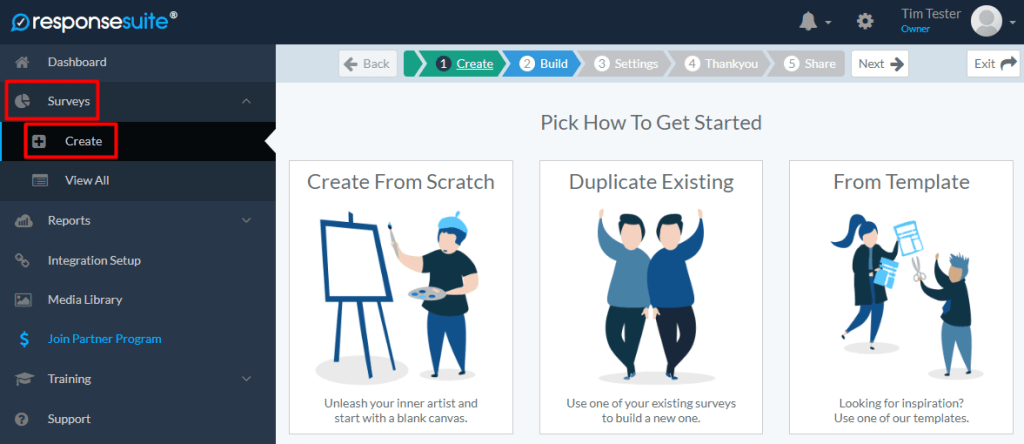
—
The example below shows an existing survey named “Have You Enjoyed the Skydiving Course” that will be integrated with WishList Member. This can be done in the Surveys > View All section of ResponseSuite.
Click the edit icon on the far right of the survey.
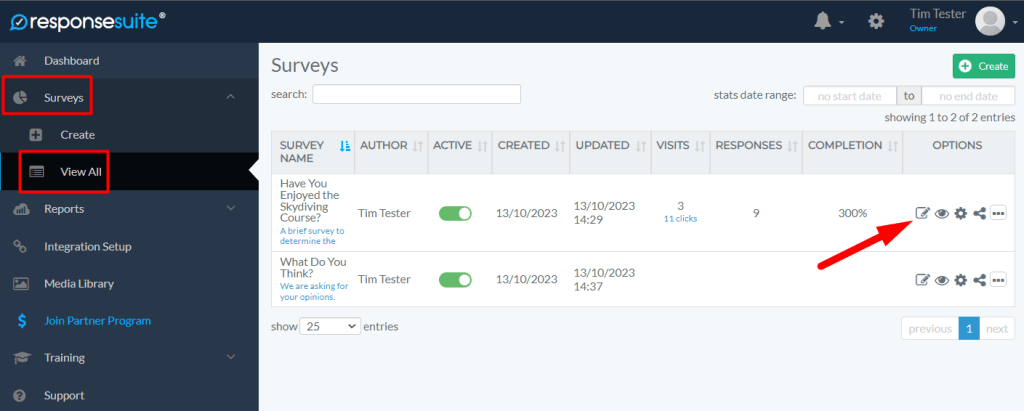
—
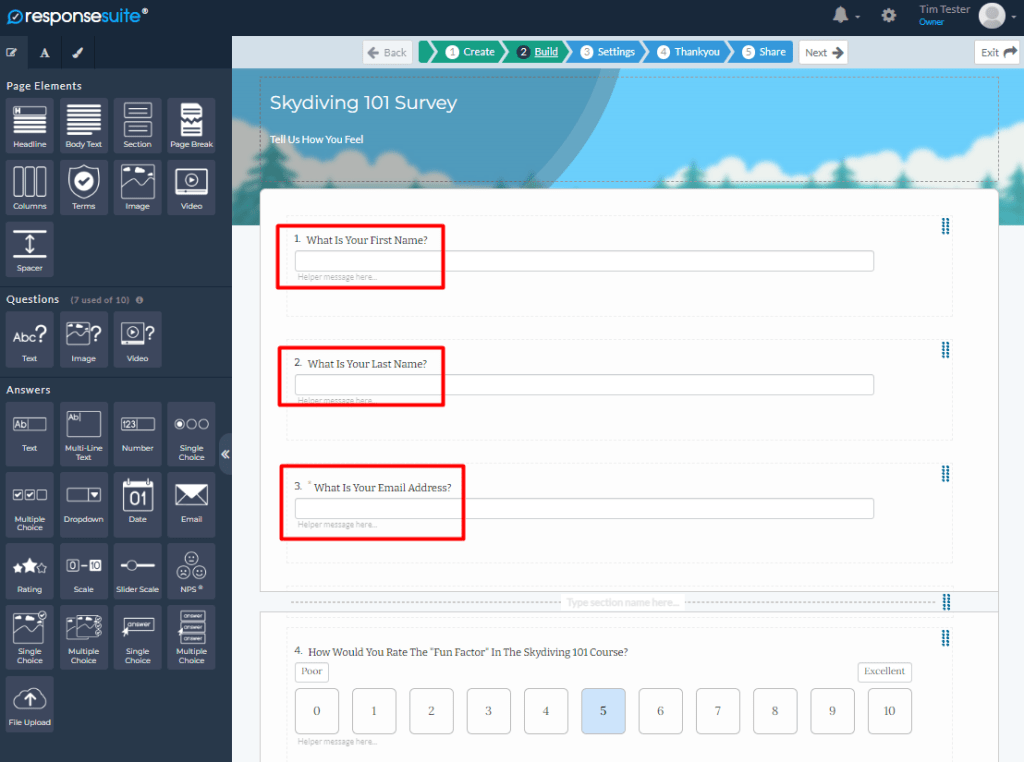
The Survey Editor appears and displays the Build section of the survey. The questions appear along with their various settings.
There is one main piece (and two more recommended pieces) of information that will need to be included in the questions in order to pass the information between ResponseSuite and WishList Member.
- First Name (recommended)
- Last Name (recommended)
- Email Address (required)
—
An email address is required to be added by the user filling out the survey as that will be used to create the member account in WishList Member or locate the existing member in WishList Member. The questions requesting that info will be connected with WishList Member in the Settings section of the Edit Survey section.
It is recommended to also include questions to ask the user to include their First Name and Last Name but it isn't required. Only the email address is a required field.
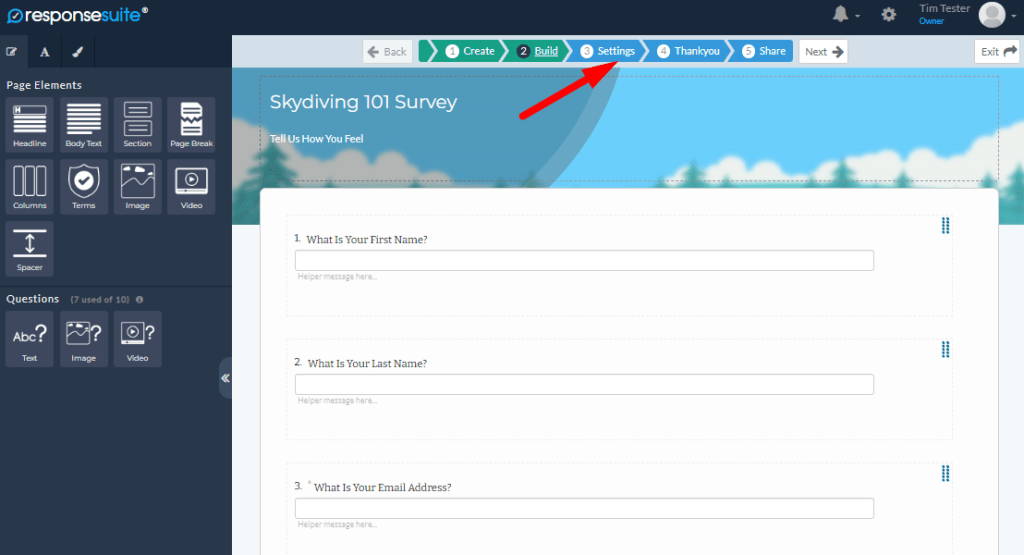
Once all your questions are configured, you can click the “Settings” option on the top of the page.
—
Connect WishList Member with the Survey
The Settings section will appear and you can select the Membership Integrations option on the left menu. A WishList Member option appears since it has been connected with ResponseSuite.
You can now connect the specific survey with WishList Member. Click the blue “Connect” button.

—
You will see two steps to configured in this section.
- Step 1 – Connect ResponseSuite fields to WishList Member fields
- This is how you will connect the Email Address (and First Name and Last Name) request fields from the ResponseSuite survey to the member account in WishList Member.
- This is how you will connect the Email Address (and First Name and Last Name) request fields from the ResponseSuite survey to the member account in WishList Member.
- Step 2 – Trigger membership levels in WishList Member
- This is how you will set if a user should be added to a membership level or removed from a membership level based on how they fill out the survey questions.
- This is how you will set if a user should be added to a membership level or removed from a membership level based on how they fill out the survey questions.

—
Connect ResponseSuite Fields to WishList Member Fields
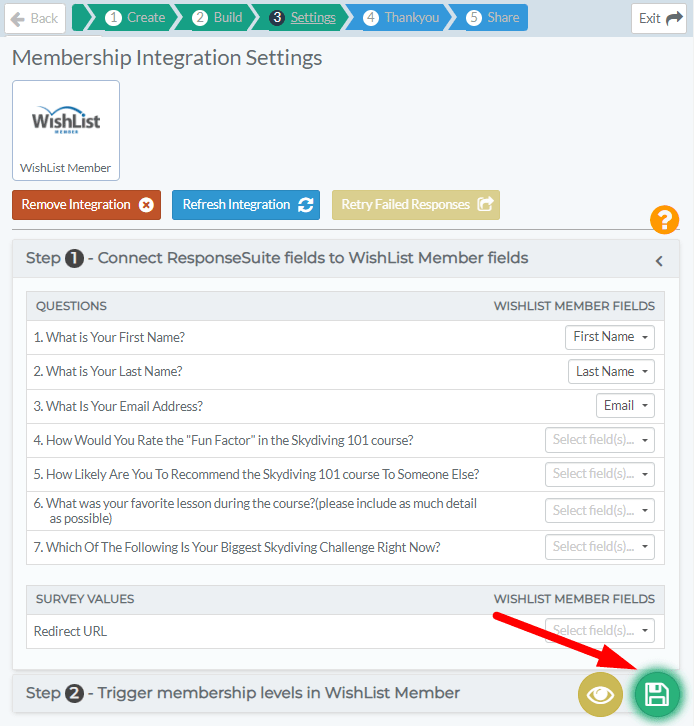
The example screenshot below shows the Step 1 section. The dropdowns under the WishList Member Fields column have been used to set First Name and Last Name for the first two questions and the dropdown is being used to select Email for the third question.
This means those three questions in the ResponseSuite survey will pass the information the user enters into those fields over to WishList Member and will create the member account or update the existing account if there is one.

—
—
Trigger Membership Levels in WishList Member
The example screenshot below shows the Step 2 section. There are a number of available settings to configure the automation of adding a user to a membership level or removing a user from a membership level.

—
Trigger. The set trigger will start the automation process of adding a membership level or removing a membership level from a user.
- Always. The trigger will always start the automation process each time a user fills in and completes the survey.
- An answer to a question. The trigger will start the automation process if the user answers the specified question.
- Choose a question. The “Choose a question” field will appear if the “An answer to a question” option is selected.
- Activate membership level(s). The membership levels from the connected WishList Member site will appear in this dropdown. You can select any level(s) you want to add to the user when they fill in and complete the survey.
- Remove membership level(s). The membership levels from the connected WishList Member site will appear in this dropdown. You can select any level(s) you want to remove from the user when they fill in and complete the survey.
The screenshot below shows a Trigger has been configured to always add the user to the Silver and Bronze membership levels in WishList Member when they fill in and complete the survey.

—
You also have the option to enable or disable the Trigger item using the green toggle on the top right. A new Trigger item can be added using the gray plus button on the bottom of the page.

—
Set a Survey Thank You Page
WishList Member is now set to process the information based on the trigger(s) that have been configured in ResponseSuite. You can now move to the next step in ResponseSuite and set a Thank You page. This can be any page or message you want to show users after they fill in and complete the survey.

—
Link and/or Embed Code for Survey
The final step is to use the survey link generated by ResponseSuite. This is available in the Share section and provides options to use a link or use an embed survey option. The embed survey option is only available if you have the required ResponseSuite plan.

—
Allow Users to Fill in the Survey
You can now allow users to fill in the survey and the WishList Member level settings you configured will be applied. Standard Link options are available and an Embed option is also available depending on your ResponseSuite plan.
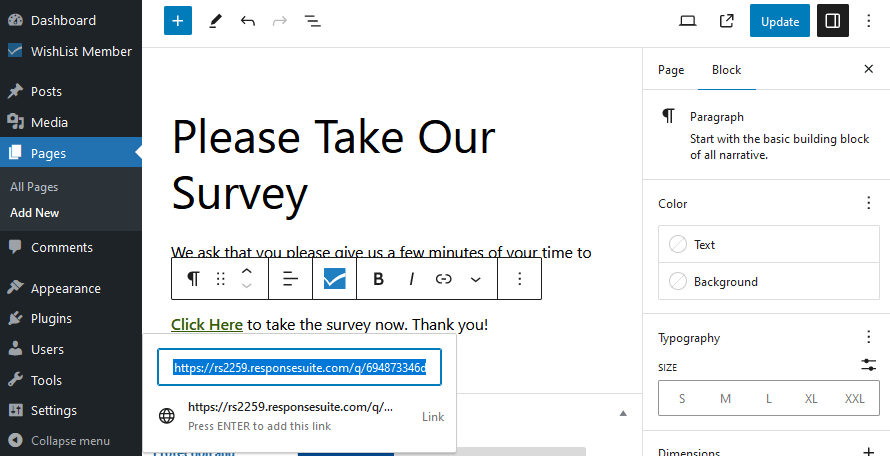
In this example, the copy icon is used to copy the Normal URL from ResponseSuite.

—
That link can now be pasted into a page on the WordPress site. The screenshot below shows the words “Click Here” have been set to link to the ResponseSuite survey page.
—
The live site will show the link and users can click to fill out the survey.

—
The survey page will appear and the user can answer the questions as they work through the survey.

—
View Users in WishList Member
The user will now be added to the Members > Manage section in WishList Member with the corresponding level(s) applied once they fill in and complete the survey. In this example, a user named Walter Tester filled in the survey so they were added as a member with the Silver and Bronze levels.

—
View Survey Results
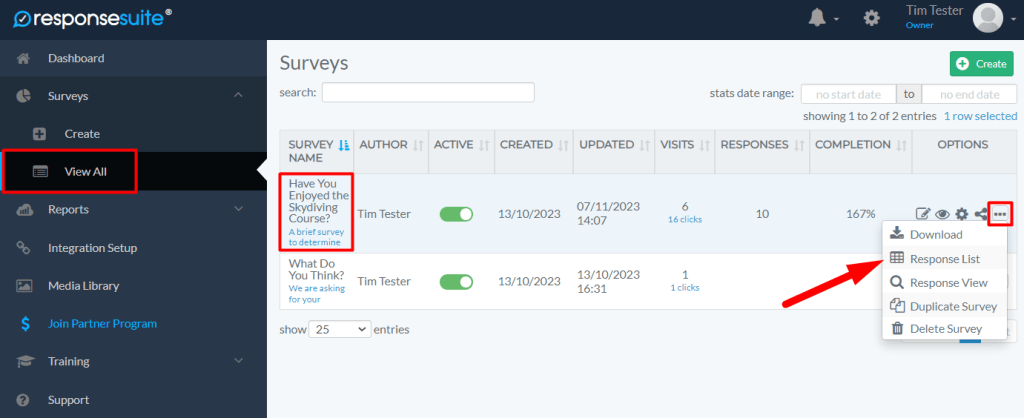
That user also appears in the Response List section of the survey in ResponseSuite. The Response List can be selected to view by clicking the three horizontal dots on the far right of the survey.
—

—
You can use the integration between WishList Member and ResponseSuite to provide members-only access to those who fill in and complete a survey. Various options are also available for you to customize the experience. A user could need to attain a specific score in order to be granted access to a membership level. Or you could even remove access depending on the survey results of a user. The choice is up to you to use WishList Member and ResponseSuite to fit your needs.
Automatically provide or revoke member access in WishList Member based on the survey you create in ResponseSuite.
