Available with WishList Member Pro and Elite plans, the Campaign Refinery integration lets you set up automations based on member behavior.
You can also apply or remove tags from a member in Campaign Refinery. This can be triggered by various actions, such as member being added to, removed from, or cancelling a level in WishList Member.
These automations help you segment your email audience for more targeted and effective email communications and marketing campaigns.
Read on for additional details including screenshots and examples.
Enabling the Campaign Refinery Integration with WishList Member
Select and enable the Campaign Refinery from your WordPress dashboard by navigating to WishList Member > Setup > Integrations > Email Providers.

Click on the toggle next to Campaign Refinery to enable the integration.

—
A Settings tab will appear and the API Status will show as Not Configured. This is because WishList Member and Campaign Refinery need to be connected using the API Key from Campaign Refinery. The connection process is quick (more details below).

—
Connecting Campaign Refinery with WishList Member
Click the blue Configure button. A Campaign Refinery Configuration popup will appear.
You will need your Campaign Refinery API Key to connect with WishList Member.

—
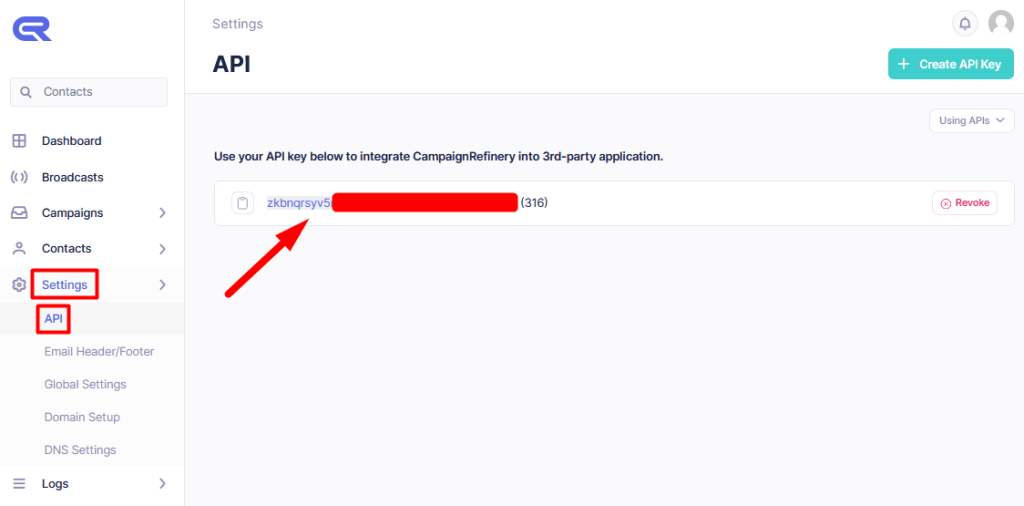
To find the API Key, log into Campaign Refinery's website and go to Settings > API.

—
Copy the API key, navigate back to the Campaign Refinery Configuration popup in WishList Member, and paste it into the API Key field.
Click Save & Close.

—
Now you will notice that the API Status in the Settings tab has changed to Connected. The Tags tab will also appear.

—
WishList Member and Campaign Refinery are now connected and the integration process can continue.
—
Integrating Campaign Refinery Tags with WishList Member
From your Campaign Refinery account, you can create tags to segment your contact lists.
The WishList Member integration lets you create automations to apply and remove these tags when triggered by certain actions in WishList Member.
For example, when a member is added to / removed from / cancelled from a membership level in WishList Member, this triggers an automation to apply or remove tags in Campaign Refinery.
1. Creating Tags in Campaign Refinery
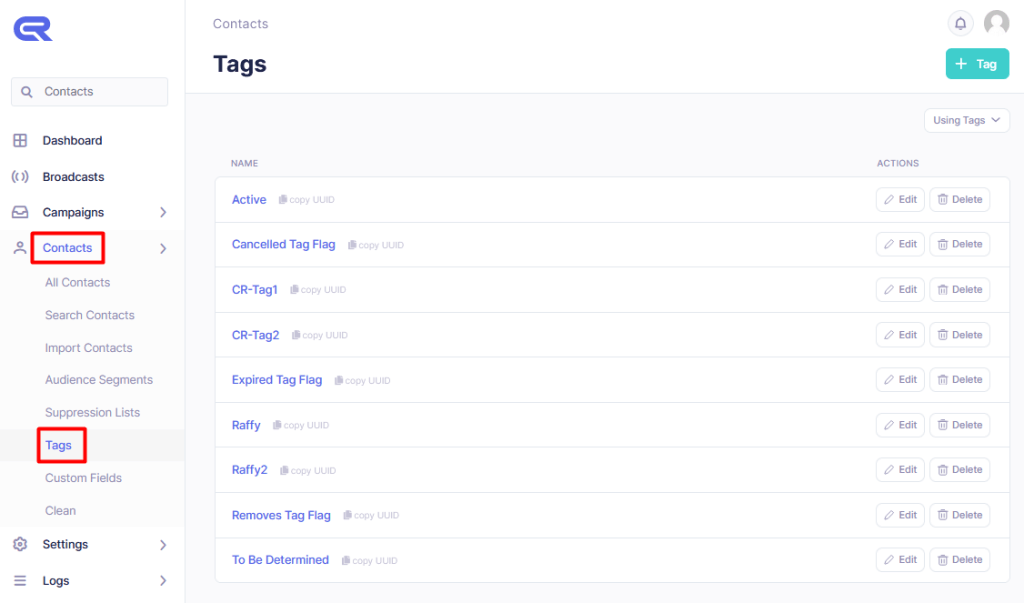
Go to your Campaign Refinery account, and navigate to Contacts > Tags to view any existing tags and create new ones.

—
2. Setting Up Automations in WishList Member
Now head back to your WordPress dashboard > WishList Member > Setup > Integrations > Email Providers > Campaign Refinery and click on the Tags tab.
Select a membership level from your list to create tag automatons. In this example, we are editing the Gold membership level.

—
In the Editing Campaign Refinery Tags for [Level Name] popup that appears, you can see a number of tabs based on Membership Level actions: Added, Removed, Cancelled, Uncancelled, Expired, and Unexpired.
Under each tab, you have the option to Apply or Remove tags based on each action.

—
In this example, we are creating an automation to Apply a Campaign Refinery tag to members when they are Added.
To do this, click on the Select tags dropdown member, and choose from the tags you created in the connected Campaign Refinery account.

—
One or multiple tags can be set to be applied or removed from contacts in Campaign Refinery based on the automations created.
In this example, the tag named Active will be applied to contacts and the tag named CR-Tag1 will be removed from contacts when they are Added to the Gold level.
Click the Save button to complete automation setup.

—
Now, any members who get added to the Gold level or register for the Gold level will get the Active tag applied and the CR-Tag1 tag removed from their contact record in Campaign Refinery.
This screenshot example shows a member named Jane Tester who has been added to the Gold level in WishList Member. Based on the settings mentioned above, that member will have the Active tag applied to their contact record and the CR-Tag1 tag removed from their contact record in Campaign Refinery.

—
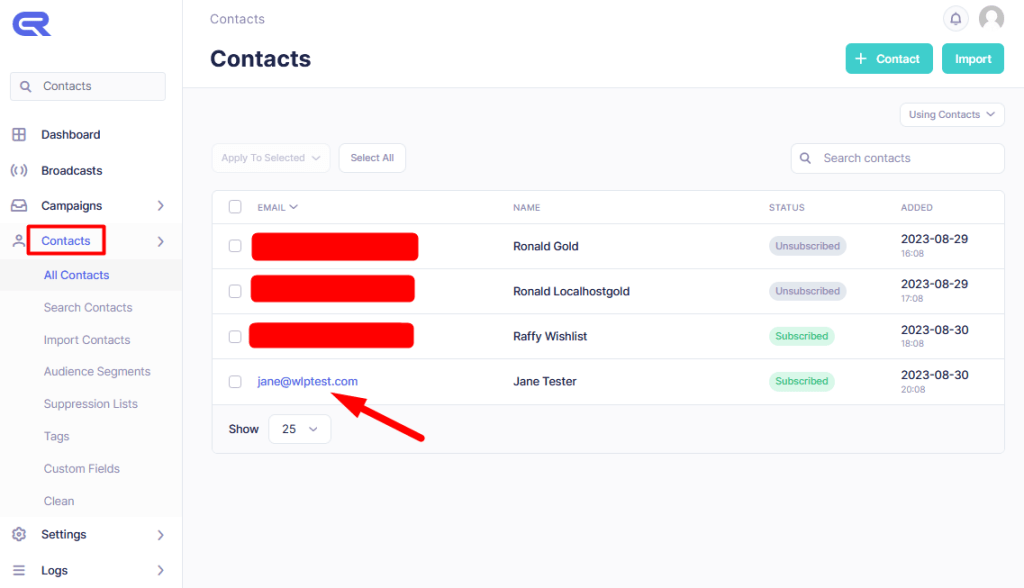
To review tags applied to a member, go to your Campaign Refinery account, head to Contacts and click the email address.

—
As you can see below, the Active tag has been applied to the member and the CR-Tag1 tag doesn't appear because it was removed from the member when they joined the Gold level.

—
Automation Based on Membership Level Actions
There are six actions that can trigger an automation between WishList Member and Campaign Refinery.
Added: When a member joins a membership level or is added to a membership level.
Removed: When a member is removed from a membership level. Members can be removed from a level via admin, level actions, sequential upgrades, and LMS Integrations Actions (eg. via the LearnDash integration)
Cancelled: When a member stops or cancels payments to their membership level and no longer have access to protected content.
Uncancelled: When a member rejoins a membership level after cancelling, or after a successful rebilling payment after having been cancelled.
Expired: When a member's membership has expired after a trial or one-time payment.
Unexpired: When a member rejoins a level by renewing membership after expiration.

—
For each of these actions you can apply and/or remove tags in Campaign Refinery.
This allows you to segment your contact list and communicate with them more effectively. For example, you can target cancelled membership subscribers with messaging about new features they're missing out on, or target lower level members with reasons to upgrade. There are countless more opportunities to create special segments with WishList Member with Campaign Refinery.
