Pssst…there’s an exciting feature of your membership website that you’re probably not taking full advantage of. Setting up WordPress page redirects. Read our guide to discover the benefits of redirects, and how to set them up with WishList Member.
Contents
When new and existing members interact with your site, you want… no you need their journey to be as pleasant and as smooth as possible.
Membership sites face a unique challenge when it comes to user experience. Logins and registrations can disrupt the user journey and make for a frustrating experience for users of your site.
When used effectively, WordPress page redirects not only offer a seamless experience for your members, they can also enhance user engagement with personalized experiences, increase member retention, and even boost average customer value.
With WishList Member, setting up page redirects a cinch, you just need to know how to do it.
Let's unpack this process and explore its potential benefits for you.

WishList Member – Your Magic Wand for Better User Experience
Click here for step-by-step instructions on building your membership site using WordPress.
WishList Member offers a wonderland of different redirect pages. Each one pops up under specific conditions, turning your users' navigation into an interactive journey.
For example:
- An ‘After Registration' page to make your members feel special right after they've registered.
- An ‘After Login' page to show them you're glad they're back.
- An ‘After Logout' page to leave a lasting impression even after they've left your site.
These tailored interactions increase user satisfaction and make them feel valued. Additionally, you can personalize the preset messages on each redirect page to resonate better with your users.
You can find these settings under Advanced Options > Global Defaults > Error Pages in WishList Member.
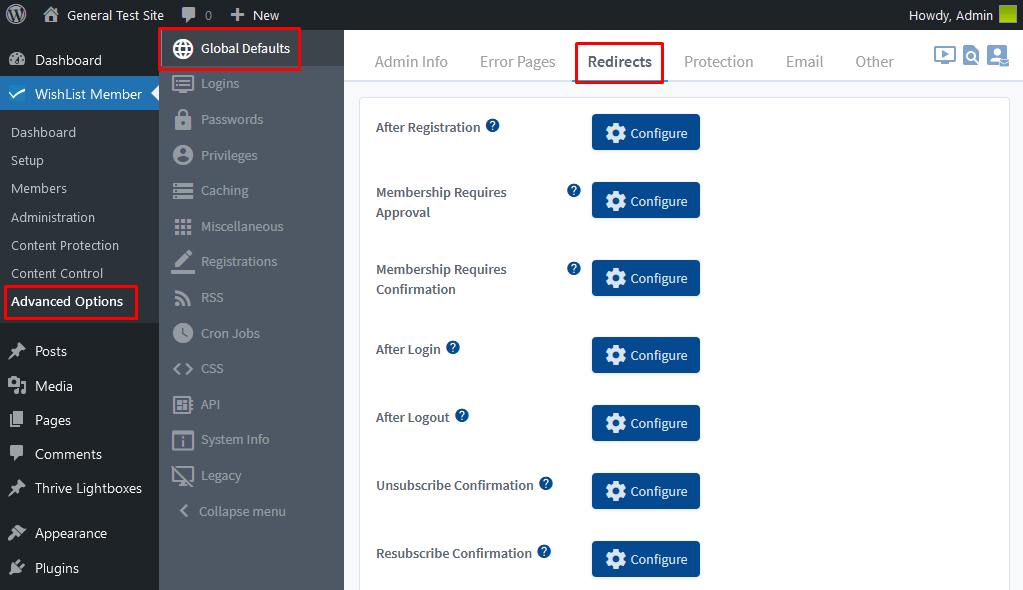
In here, you'll find different types of redirect pages you can configure. Let's discuss what each of them means one by one below.
Global Default Redirect Pages
After Registration
So your member just joined a membership level? Sweet! They'll see a special After Registration page. Heads up, it's a one-time deal, so they won't see it again. Next time they log in, they'll land on the After Login page.
Membership Requires Approval
Some memberships need a thumbs-up from the site admin, or you. In these cases, your members will see a Membership Requires Approval page.
You can find the setting for this under Setup > Levels > Edit Level > Requirements in WishList Member.
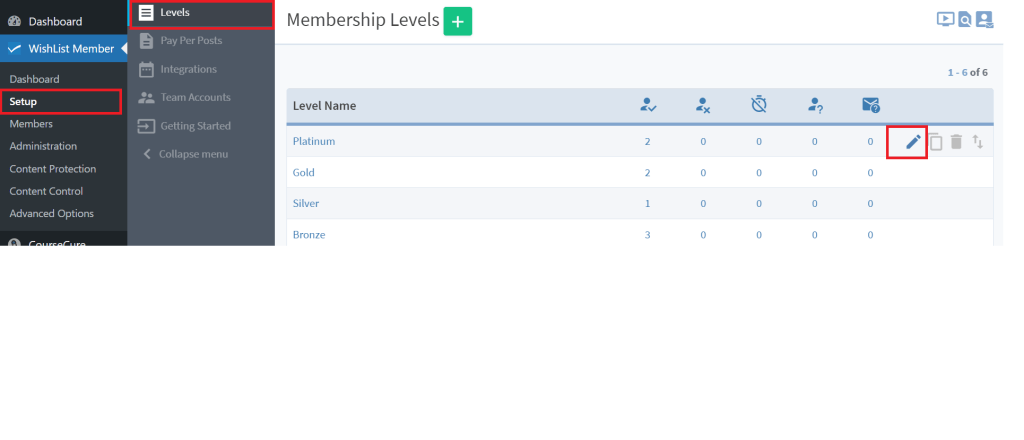

Membership Requires Confirmation
This will be shown to members after they've successfully registered to a membership level that requires them to confirm using the email they used. This setting is also in the Requirements section.
After Login
Every time a user logs in, they'll see this page. If a user is in multiple membership levels the page they'll see will depend on the Level Order. We’ll go into what level order is and how to change it later.
After Logout
This will be the page your users will see after they log out.
Unsubscribe Confirmation
If a member opts out of your email list, they'll see an Unsubscribe Confirmation page.
Resubscribe Confirmation
This will show up when a user decides to resubscribe to the Email Broadcast list in WishList Member.
How to Set Up Custom Redirects for Different Membership Levels
You've got your global redirects sorted. Awesome! But what if you've got multiple membership levels? You'll probably want different After Registration and After Login pages for each. Good news: it's doable, and here's how.
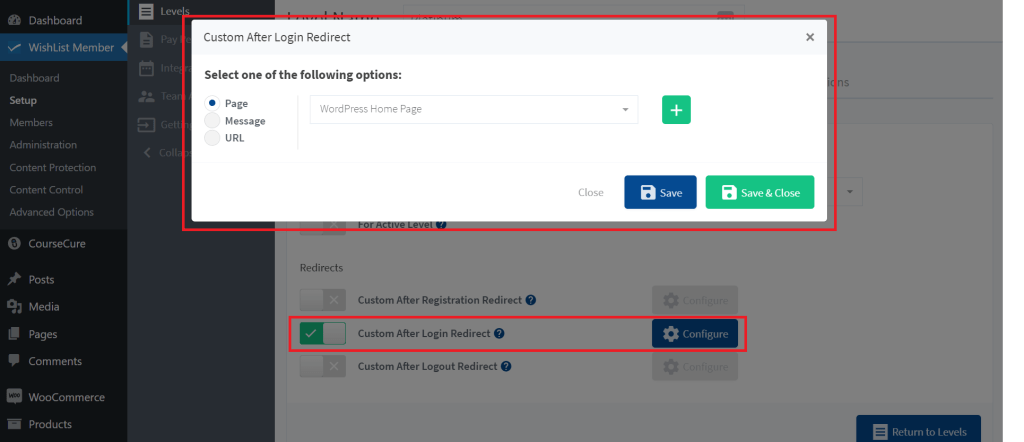
- Go to the WishList Member menu and click Setup.
- You'll see the level you made. Click on it.
- Then hit Additional Settings. Voila! A Redirects section appears.

Inside this section, you'll see Custom options for After Registration and After Logout. Toggle the one you want to change. A Configure button pops up.
Who Gets What Redirect?
If you're wondering which redirect happens when a member belongs to multiple levels, meet Level Order.
How to Sort Level Order
- On the Levels screen, you'll see your list of levels.
- Want to change the order? Just hover over the level name.
- An icon with two arrows will appear. Click and drag to rearrange.

For example, if you have Silver and Gold levels and want Gold members to get priority, just drag Gold to the top. Now, anyone who's both Silver and Gold will get the Gold redirect. Cool, right?
Why Steering Members to Certain Pages is a Game-Changer
Let's face it—no one sticks around a dull party. Your membership site is no different. A fun, engaging experience is like the life of the party; it keeps people coming back for more.
Oh, and guess who's more open to those nifty add-ons or new courses you offer? Yep, engaged members.
Here are some of the benefits of using redirects, and how they enhance the user experience.
Keep Members Cool and Coming Back with a Smooth User Journey
Ever think a road sign is trivial until you're lost? That's what redirects do—they're your member's “road signs” to a smooth ride on your site. It's not just a time-saver, but a life-saver for anyone who hates detours and roundabouts on the web.

If you’ve ever felt frustrated navigating a website, you know full well how it impacts the likelihood of returning to that site or buying from that brand.
For a membership site, these small changes have a huge impact on your bottom line.
Optimize Content Delivery
Roll out the red carpet for your members and lead them right to the most relevant content for them. Send new members to a hearty welcome page, guide the seasoned folks to exclusive content, or even treat different membership levels to their own personalized experiences. The sky's the limit here!
By guiding members to specific content, you ensure they're not overwhelmed and can easily find what they're looking for, leading to a smoother user experience.
Reduce Bounce Rate By Letting Users Resume Their Journey
Imagine you're in the middle of a cliffhanger episode, and boom, an ad break! Annoying, right? Same goes for logging into a site and losing your place.
Redirects can take you back, letting you pick up where you left off. That's user experience at its best!
The Art of Redirecting Members
So we've talked about how redirects make life peachy for your members. But let's spill the tea—redirects are also your secret weapon for steering folks where you want 'em. It's like playing tour guide in your own digital theme park!
Increase Average Customer Value with Upselling and Cross-selling
Got a shiny new feature or a killer upgrade deal? Lead the way! With redirects, you can put up a neon sign that says, “Hey, check this out!” Point them to your pricing page for an upgrade or take them window shopping through your latest offerings.
Maximize Product Value with Onboarding Redirects
One of the biggest challenges businesses face after acquiring new members is ensuring they fully understand and utilize the product or service.
This is where onboarding comes into play, and redirects can play a key role in this process.
Not all features of a product are immediately apparent or intuitive to new users. Redirects can lead members to underutilized but valuable features, ensuring they get the most out of their membership or subscription.
Enhanced Data Insights for Better Decision Making
Every time you redirect a member, you're also gathering valuable data on their preferences, behaviors, and journey through your site.
This data is gold when it comes to refining your content strategy, understanding what truly resonates with your audience. With some hard stats under your belt, you can make informed decisions to further enhance the member experience.
In essence, redirects not only improve the user experience but also provide you with actionable insights to continuously evolve and adapt.
Best Practices for Redirects
Ok, so you’re all clued up on what redirects are, how they work in WishList Member, and why they’ve a big deal. Now it’s time to give you the skinny on tips and best practices to really amp up your site’s functionality and member satisfaction:
1. Understand Your Audience's Needs
User Behavior Analysis
Make the most of analytics tools to gain insights into which pages your members visit, their common drop-off points, and the content they engage with the most. This data can guide your redirect strategy.
Feedback and Surveys
Engage with your members by occasionally seeking feedback. Their insights on what they'd like to see more of or areas they find confusing can be invaluable in refining your redirects.
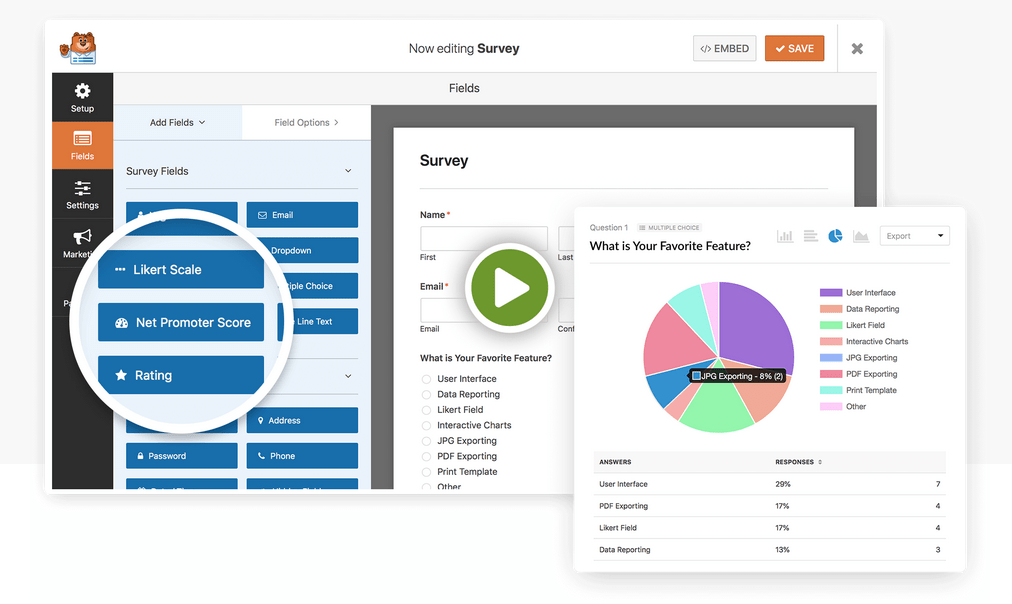
Use an intuitive form builder on your membership site like WP Forms to put together a survey. Consider offering a giveaway to incentivize participation.
2. Prioritize User Experience:
Avoid Overwhelming Members
While redirects can be powerful, it's essential to use them with care Overloading users with too many redirects can be counterproductive. Strive for a balance that enhances user experience.
Regular Testing
Before applying any redirect, test it thoroughly. Make sure it directs users to the right page quickly and offers the intended experience.
3. Address Potential Challenges:
Stay Vigilant for 404 Errors
Redirects can sometimes lead to non-existent pages, especially if content is moved or deleted. Regularly audit your redirects to ensure they lead to active, relevant pages. Update any that don't.
Avoid Multiple Redirect Chains
Chaining several redirects together can slow down the user experience and may lead to frustration. Aim for direct, one-step redirects whenever possible.
By adhering to these best practices, you can ensure that your redirects are functional and elevate the overall experience for your members.
Cultivate an Engaging Membership Experience with WordPress Page Redirects
A WordPress page redirect does a lot more than just guide traffic; when used strategically, it's an opportunity to curate exceptional member experiences.
With redirects, you can make your site more inviting, interactive, and user-friendly. Members who feel valued are more likely to stay, engage with your content, and even invest more in your offerings.
In this guide, we've unveiled the art of using WordPress redirect pages to create a VIP experience for your members every time they visit. And with WishList Member, the process of setting up redirects couldn't be easier.
Found this blog useful? Follow us on Twitter, Facebook, YouTube, and LinkedIn for more tips and best practices to make the most of your WordPress membership site.
