Contents
In this post, I'm going to walk you through every step to build your membership site and get it launched. So, if you've been looking for someone to just tell you what to do, this is it. Here are the nine steps we'll be walking through:
- Set Up a Domain Name and Web Hosting
- Install WordPress
- Configure WordPress
- Install Plugins
- Install Theme
- Install and Configure WishList Member
- Create a Dashboard Page
- Create a Sales Page
- Create Admin Pages
I know that might seem a bit daunting when you first look at it, but most of this goes pretty quick and is a lot easier than it looks. And, I'm going to guide you through every step. So, if you're ready to get your membership site launched and open for business, let's get started.
Step #1: Set Up a Domain Name and Web Hosting
The very first thing you'll need to do is register a domain name and set up your web hosting for your membership site. This is where your site will “live” online. So, we'll start by heading over to Bluehost and registering your account using our 50% discount:
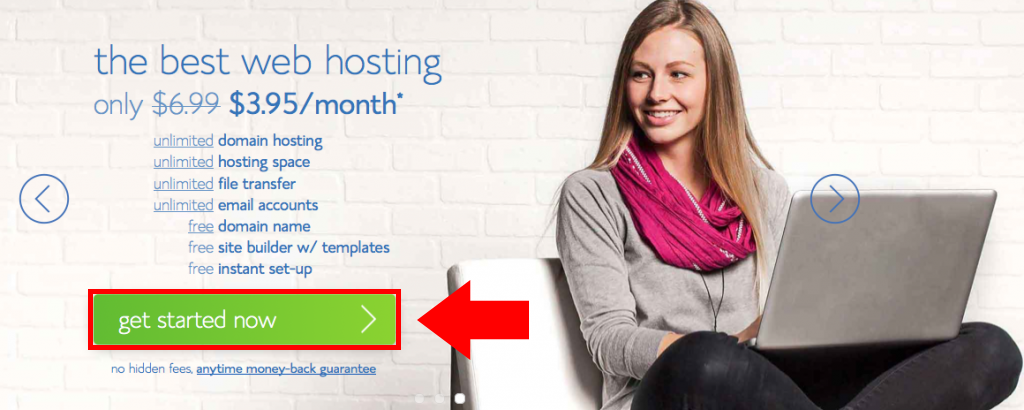
When you get to the Bluehost homepage, click on the “Get Started Now” button:
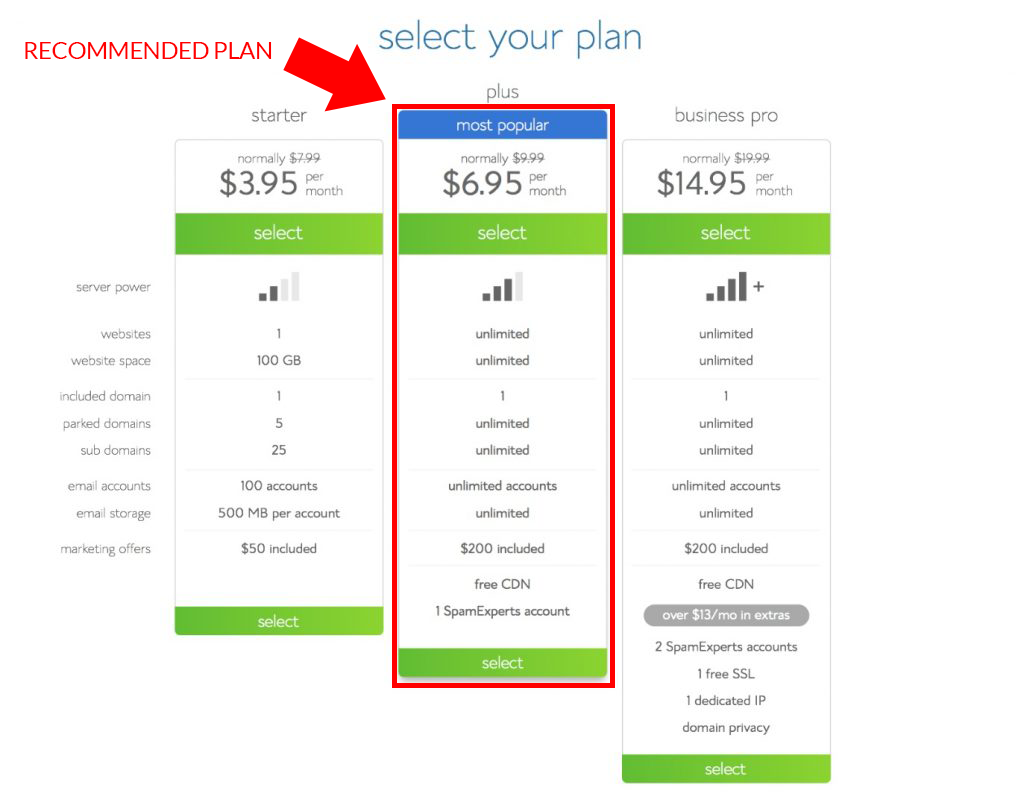
Here, you’ll see the various plans Bluehost offers. I recommend the Plus Plan because it’s very affordable and comes with unlimited websites, domains, bandwidth, etc. It's what you'll want to grow your membership site over time. Just hit the “Select” button on the plan you want:
Now, here’s where you need to specify if you have a domain already or not. If you don’t, simply enter your desired domain name in the “New Domain” box. If you do have a domain, then simply enter it in the “Transfer Domain” box.
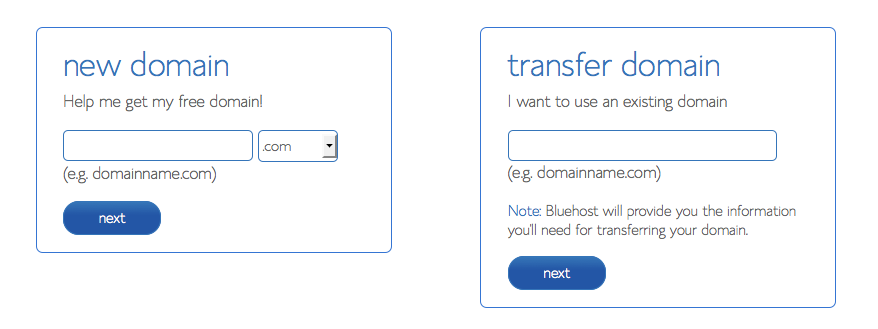
You’ll also notice the “note” in the “Transfer Domain” box says Bluehost will provide you with instructions on transferring your domain. This is a small extra step you’ll need to take if you already have a domain. But, it’s really simple and Bluehost will walk you through it:
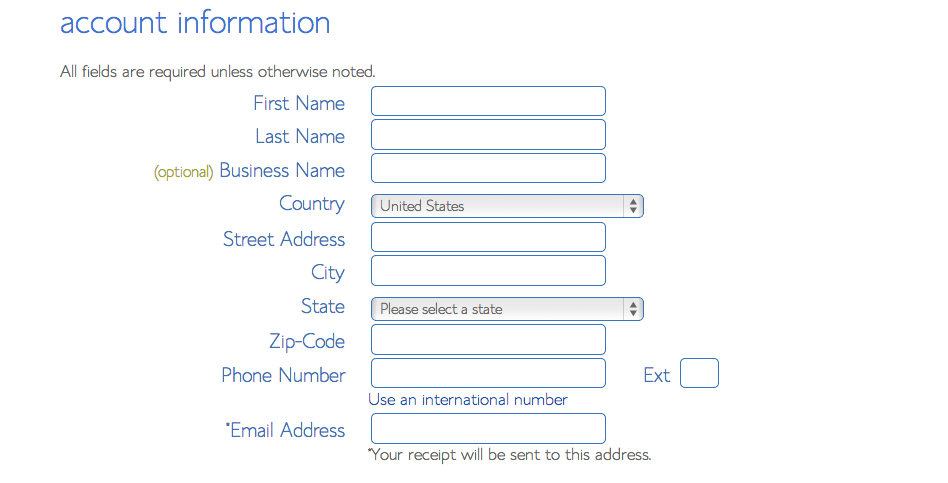
Next, you’ll need to enter your contact information. Pretty standard stuff here:
Then, you’ll be offered add-ons for your hosting package. Again, pretty standard offerings. SiteLock and Site Backup are two I would consider heavily.

SiteLock essentially makes sure nobody can steal your domain (I’ve had it happen) and Site Backup helps you backup and restore your site if something breaks.
I strongly recommend a service like this. If not here through Bluehost, then somewhere.
The others aren’t something I’d use… unless you have some reason you need the privacy protection. But, most people don’t and you probably already know if you do.
Also, you'll be asked what plan you'd like. I recommend doing the 36-month plan. It just locks in your domain and hosting for the next three years, so you don't have to think about. Also, it locks in the discounted price you get from us.
Once you’ve selected your plan, enter your billing information and continue on:
At this point, Bluehost has a few additional offers they’ll walk you through. Like additional domain names and such.
Generally, I don’t find that kind of thing necessary but if you wanted to snatch up all the variations of your domain name, you could. I never do. But that’s me.
Once you’re done with the payment process, you’ll see a Welcome screen like this:
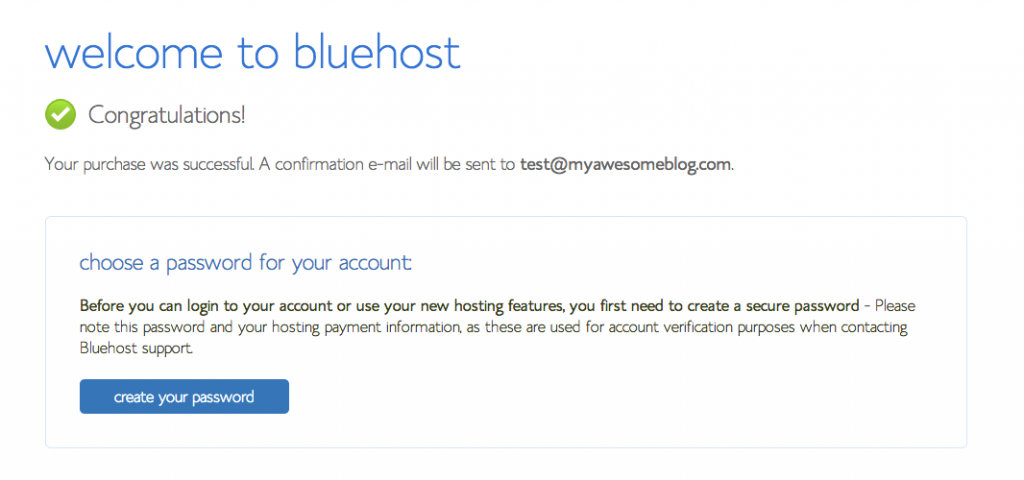
Click on the “Create Your Password” button and you’ll see a page where you can set your password, like this:

Please, please, please use the Password Generator here and do NOT use a password that you’ve used anywhere else or that’s “easy to remember”. Speaking from experience… if you do you will get hacked at some point.
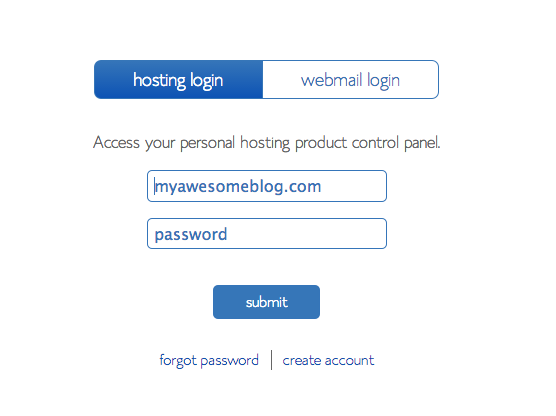
Once done setting your password, hit “Create” and you’ll be taken to the Bluehost login where you can login with your new credentials:
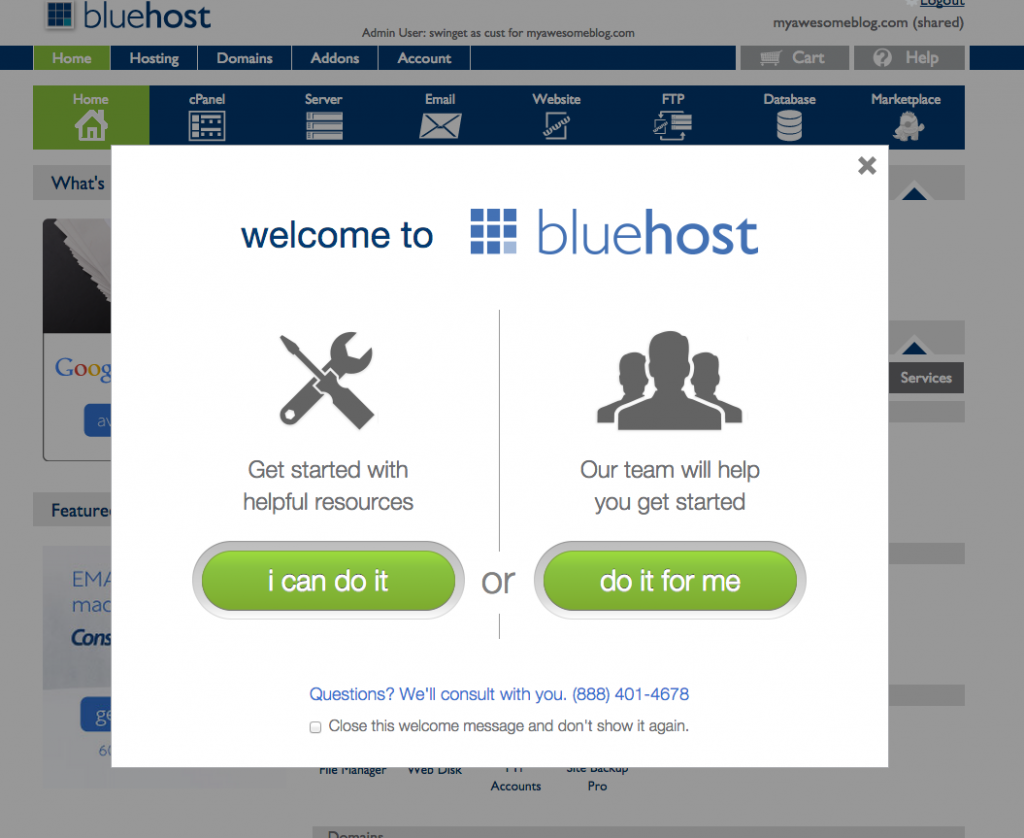
Once logged in, you’ll see a welcome pop-up. Just go ahead and hit the “I Can Do It” button:
And now, you've fully registered your domain, created your hosting account and got everything set up and ready to go. Next, is to install WordPress and get your membership site up and running. We'll do that now.
Step #2: Install WordPress
Now that we've registered our domain name and set up our hosting, we need to install WordPress and get our membership site set up. You should be logged into Bluehost and see your cPanel dashboard which looks like this:
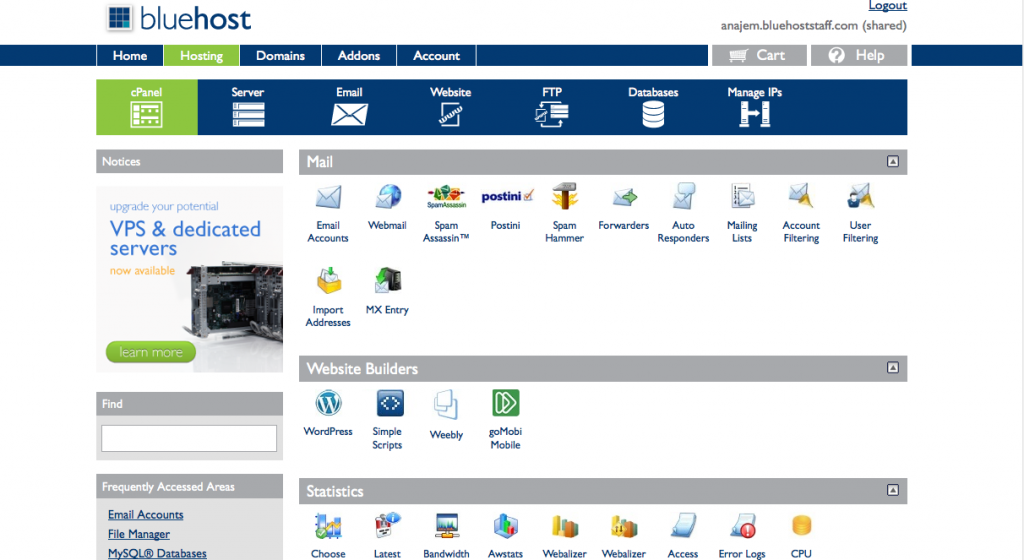
What you want is the WordPress icon. Click that and we’ll install WordPress for your publishing platform. You’ll now see a page like this:
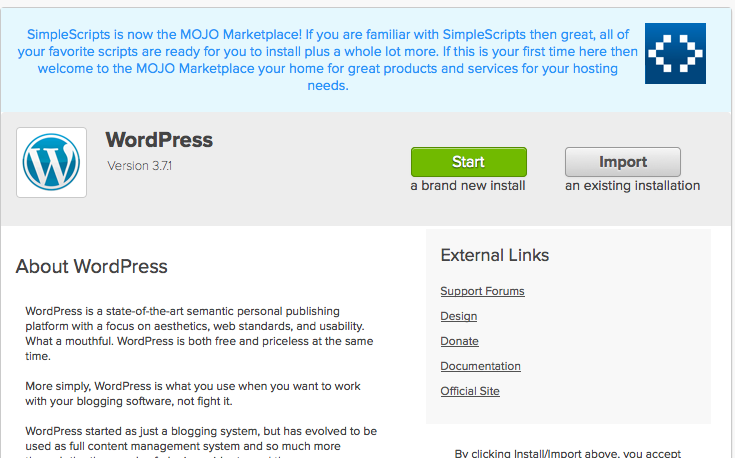
Click the “Start” button so we can start installing WordPress. It’ll first ask you what domain you’d like to install it on:
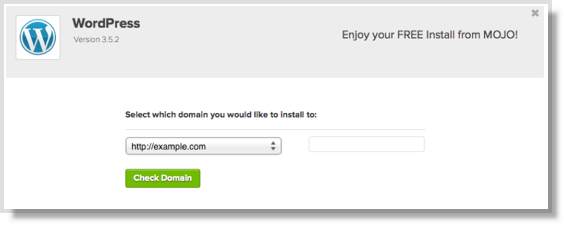
Of course, you’ll select the domain you created (or transferred) when you created your account. You’ll then see an installing screen. Simply wait for this to finish:

Once finished installing, you’ll be asked to enter some basic info including your desired admin username and password.
Do NOT make your admin username “admin”. Usually your first and last name are fine or your email address. Also, again (broken record) use a unique password that is not easy to remember. Then, hit “Install Now”:
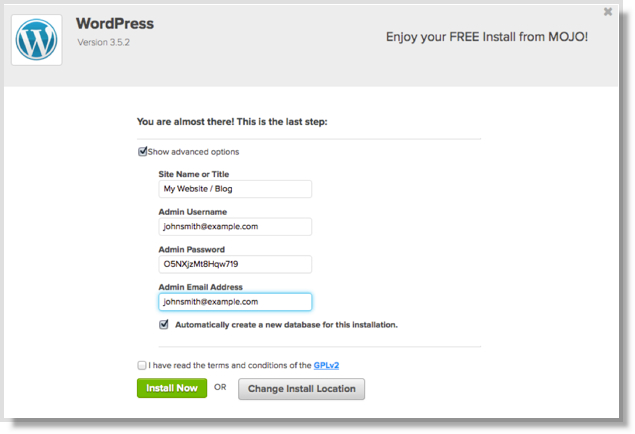
Once installed, you’ll see a completion screen like this:

Now, check your email because you’ll receive a welcome email with all your relevant WordPress login info including where you need to login at. Click the URL in the email and bookmark it. You’ll be going here a lot:
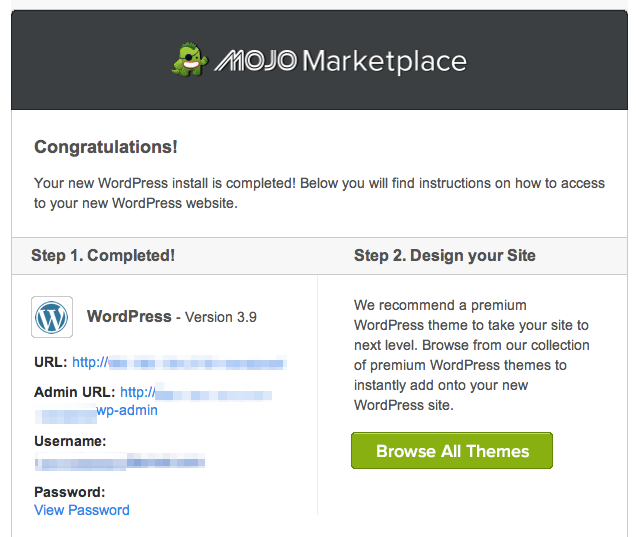
That URL will take you to the WordPress login screen where you can login in with your WordPress credentials (in the email):
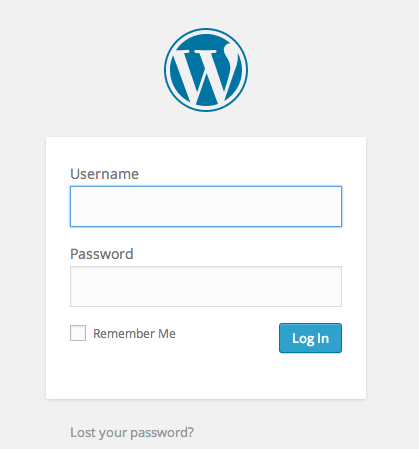
Once logged in, you’ll be taken to the WordPress dashboard page which is now your home for creating our membership site content!
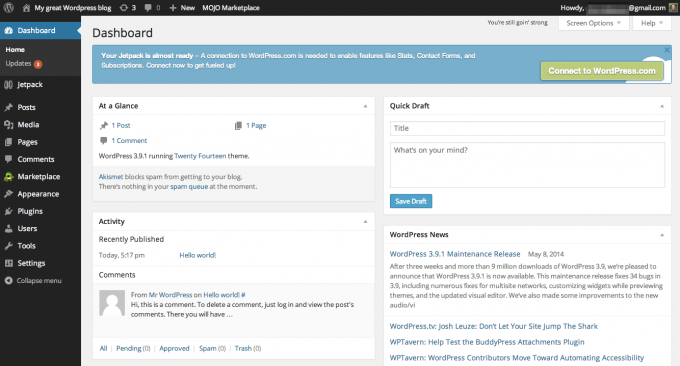
Give yourself a pat on the back, because you now have your membership site live on the internet! This is a big first step to get out of the way. Of course, we're going to keep going. I'll show you my standard WordPress setup, which plugins I recommend you install, what theme you should use, installing your membership software, accepting payments and more.
Step #3: Configure WordPress on Your Membership Website
Here’s a very quick run-down of the things you need to know about WordPress:
- Posts. Posts are exactly what the name implies. These are your blog posts that contain your content. These are the main thing you’ll be posting. With WordPress, you simply create a new post for each piece of content and it handles all the display stuff for you.
- Categories. Again, self-explanatory. You can create categories to help organize your content. For example, on our blog we have a “Cost” category and any posts we create related to membership site costs we put in that category and WordPress displays them accordingly.
Pages. Pages sometimes confuse people because they look an awful lot like posts. The main difference is that pages will NOT show up in your regular post listings. So, for example your homepage that lists all your posts will NOT show pages. Pages also don’t get categorized. Pages are meant for “administration” type stuff like your “Contact” page or a “Support” page.
- Themes. Themes control the look and feel of your site. They are what control how your content is displayed. Different themes will have different colors, layouts, options and so on. It’s worth taking some time and browsing the free themes available and finding one you like.
WordPress Membership Plugin Settings
Plugins add functionality to your site. For example, a plugin like Contact Form 7 will let you add contact forms to your site. Or a plugin like WishList Member will help turn your blog into a membership site. Just don’t overdo it. Generally speaking, more plugins means more overhead. You want to keep your site lean and fast.
On a side note, if you want to dive all the way into learning WordPress, I recommend this WordPress course from Shawn Hesketh. It's the gold standard for WordPress courses.
Configure WordPress Settings
So, with that basic understanding let’s run through setting up WordPress so you can start blogging. Let’s start with the general settings. On the left side of the WordPress Dashboard, click on the “Settings” tab. This will take you to the General Settings page:
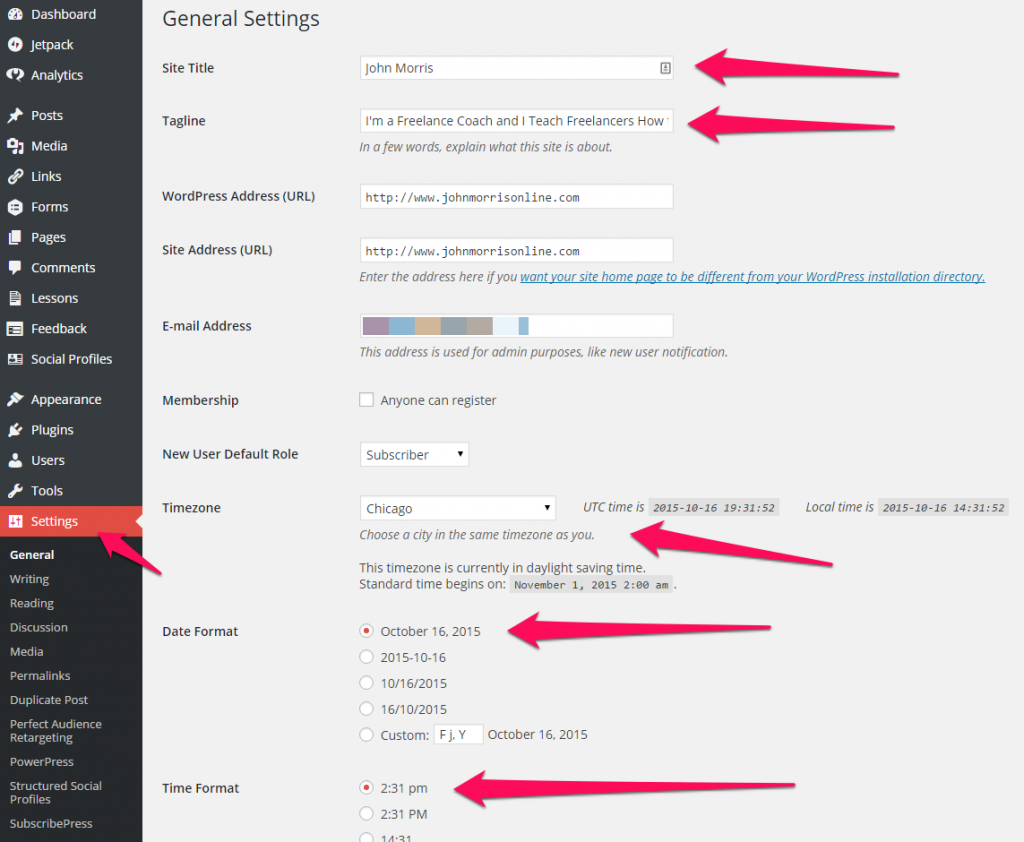
Set your site title, site tagline, timezone, date format and time format. These are used in various places on both the front and back end of WordPress.
Next, click on the Settings > Permalinks tab:
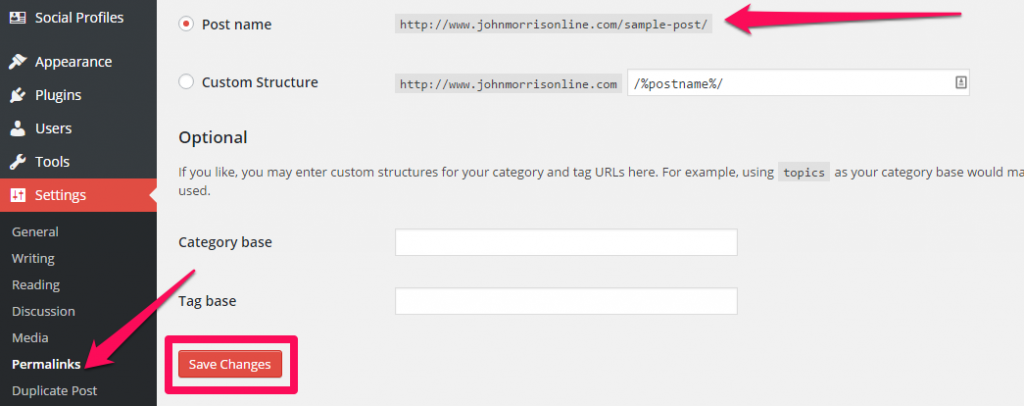
99.9999999999% of the time you’ll select the “Post Name” option. The only time you won’t is if you know something I don’t and one of the other options is somehow better. But, you’ll already know that and you’re smarter than me so have at it.
Create Your WordPress Menu
Next up is your menus. This is the menu bar that displays across the top of your site. You can specify what links appear there.
To do this, we’ll need to create a couple pages to display in our menu. So, go to Pages > Add New:
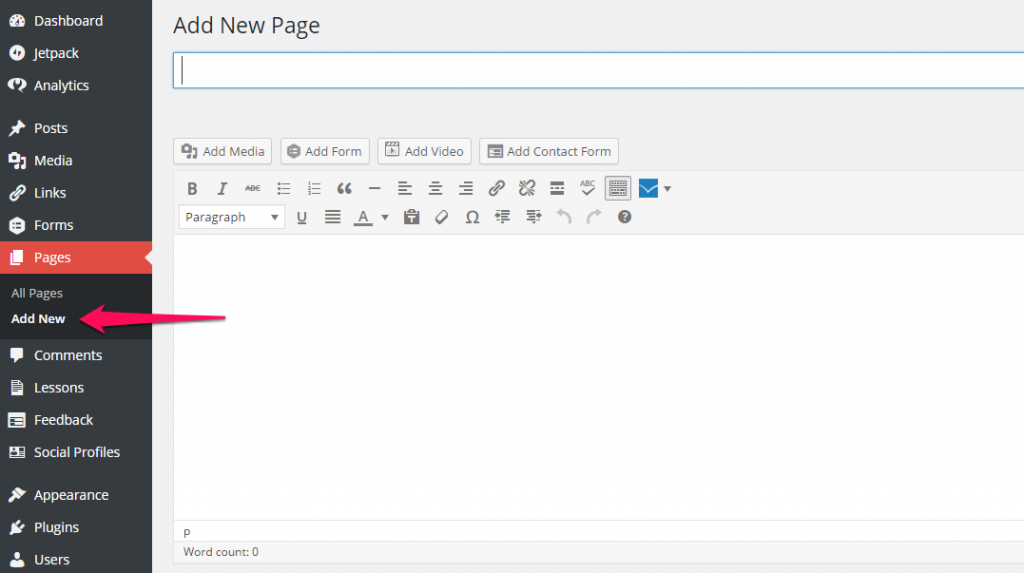
For now, we’ll create two pages: About and Contact. You can simply just enter the title for each page and save them. You can come back and edit them later. We just need them created so we can add them to your menu.
Once those two pages are created, head over to Appearance > Menus:

Here, there’s a few things to look at. First, you have Menus and you have Theme Locations. On this page, you’re essentially accomplishing two things:
- Creating menus with your desired menu items
- Associating menus to display locations
So, each theme will have different “locations” where you can add menus. Most will have a menu bar at the top which is usually the Primary Navigation Menu. But, there could be many others.
You can create multiple menus and associate different menus with different locations. So for example, you could have one menu with one set of items at the top of your blog and another menu with a different set of items in your footer.
This screen does all that.
For now, we’re worried about the Primary theme location.

Create a new menu and name it Header Menu (or whatever name your prefer).
Then, on the left side under “Pages” check the boxes next to “Home”, “About” and “Contact” (the two pages we just created) and select “Add to Menu”.
Then, at the bottom select the “Main” checkbox (for different themes, this name can be different. “Primary” for example) under the “Theme Locations” section.
Then, hit “Save Menu”. This will add those items to your menu and associate that menu with the primary theme location. If you go to the front end of your site, you should now see those menu items at the top of your blog.
Configure Your Widgets
Now, we can move onto widgets. Go to Appearance > Widgets. This is where you can add items to the sidebar of your blog.
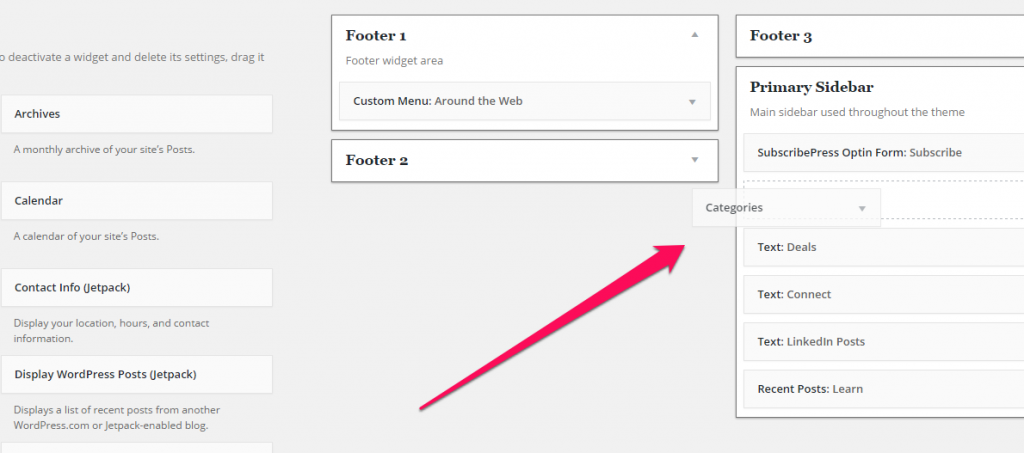
Again, different themes will have different Sidebars where you can add widgets. However, most will have a Primary or Default sidebar.
For now, simply drag the Recent Posts and the Categories widget from the left side of the screen over to the Primary Sidebar and drop them there.
This will add these widgets to your sidebar.
Finally, click the home icon on the top left of WordPress. This will take you to the front end of your site so you can see how it looks. You should now have a site with your menu, widgets, logo and all the basic stuff set up:

To get back to the “back end” of WordPress you can click the “Dashboard” link in the top menu bar:

Ok, so now we have WordPress configured. There are a lot more options, but these are the standard ones we set on every site. With that done, it's time to talk plugins.
Step #4: Install Plugins
Now, it's time for everyone's favorite part: installing plugins. I'm going to show you the default plugins I install on every membership site we build. But, before I do… a quick word of warning. WordPress plugins tend to be like phone apps for most people.
They're exciting.
And, it's easy to fall into a “more is better” mentality.
We, on the other hand, try to install as few plugins as possible. Because every plugin you install adds complexity to your site. It's more “stuff” for you to manage. More possibility for conflicts and errors. And, decreased site speed.
So, try to be thoughtful about what plugins you install.
I know, party-pooper.
But, it is the right call.
That said, here's our default list of plugins:
- Yoast SEO. As the name implies, handles SEO setup for you.
- MonsterInsights. Connects to Google Analytics for site stats.
- Custom CSS and JS. Easily add CSS and JS snippets. Handy for tracking codes.
- Elementor. Page builder. What I use to do all the building on my sites.
- Wordfence. Security plugin.
- WP Super Cache. Caching plugin to improve site speed.
Most of these are going to have free and premium versions. That's become the standard business model in WordPress. The free versions are still very useful. They do most of the basic stuff you need done.
And, the premium options just add even more features.
So, up to you, how to handle that.
Personally, we have premium versions of Yoast SEO, Custom CSS and JS and Elementor. Ok, so let's talk about how to install plugins.
The first option is the…
Install Plugins From the WordPress Repository
Head over to Plugins > Add New:

On the right side, type in the name of the plugin you want install into the search bar:

And, click the “Install” button on the plugin you want to install. Once installed, the button text will change to “Activate”. Click the button again and the plugin will be fully activated and running on your site.
That's it.
You'll be able to find and install most plugins this way.
Some, however, are not in the WordPress repository and will needed to be installed manually. But, don't worry, it's still pretty simple. Here's what to do:
Install Plugins Manually
With these plugins, whenever you download them… what you get is a “zip” file. So, it might look like this in your browser:

Once the file is downloaded like this, we'll again go to Plugins > Add New, but this time we'll click on the “Upload Plugin” button:

Here's what you'll see:

Click the “Choose File” button and find the .zip file you just downloaded on your computer. Then, click the “Install Now” button. This will upload and install the plugin on your site. Once it's done, you'll see a page like this:

Click the “Activate Plugin” button and it'll be activated and running on your site.
And, that's it.
So, that's installing plugins. I'd get started with the ones I recommended:
- Yoast SEO. As the name implies, handles SEO setup for you.
MonsterInsights. Connects to Google Analytics for site stats.
Custom CSS and JS. Easily add CSS and JS snippets. Handy for tracking codes.
Elementor. Page builder. What I use to do all the building on my sites.
Wordfence. Security plugin.
WP Super Cache. Caching plugin to improve site speed.
And then, only add more when you truly need or want it for something.
SIDE NOTE: All these plugins have either 1) a really good setup wizard to get started OR 2) default settings that are generally want you want. For that reason, I'm not going to get you bogged down in going through all that. Install, activate and if they have a wizard, step through that. And, if not, then the default settings will be good for now.
Step #5 Install Theme (OceanWP)
Themes control the final, front-end look of your site. How your visitors are going to see it. So, this is always tricky, because everyone has their own ideas about what looks good and what doesn't. So, I'm going to show you some options for themes.
And then, I'm going to show you what we do.
Let's start with…
Install a theme from the WordPress Theme Repository
To do that, head over to Appearance > Themes and click the “Add New Theme” box:

You'll see a list of all the themes in the WordPress Theme Repository. Thousands of them. And, this is where it can get a bit overwhelming. Which is best? Which one will look the way I want? Which does everything I want to do?
There's no real good answers.
It's a matter of trying them and seeing what you like.
BUT… like I said, I'm going to show you what we do.
That said, to install a theme, simply click the “Install” button:

Just like with plugins, once it's installed, the button text will change to “Activate”:

Just click the button again and that will now be “live” on your site.
And, that's it. Every theme is different with different options and layouts, etc. So, again, you just have to experiment and see what you like.
But, with that said, let me show you…
What We Do
And, that is to actually not rely on the theme for the design of our site, at all. So, one of the great features inside Elementor is its “Theme Builder” options. What it does is let you build your theme pages IN Elementor.
Now, you do need Elementor Pro for this.
But, it's well worth the investment.
We do it this way, because it “decouples” our design from the theme, so we don't have to worry about theme updates and all that. Plus, we can build our theme how we want it to look. And, it's all done through “drag and drop”, so you don't need to be a developer to do it.
If this is the route you want to go, then we still need to install a theme, but we're going to install a very specific one that's designed to work closely with Elementor. And, that is the OceanWP theme.
To install it, just search for it in the Theme Repository. Then, install and activate it just like any of the other themes.

And, that's actually it. We're not going to do much with the theme itself. Instead, we're going to use the Theme Builder in Elementor to build our header, footer, archive pages, blog post pages, home page… all of it.
Step #6: Install and Configure WishList Member
I've put this in its own section, because it's your most important plugin and we're going to go through it in more detail. First, you need to get a copy of WishList Member.
Next, upload and activate it like any other plugin (see step #4).
Activate Your WishList Member License
Click on the WishList Member menu and select Dashboard. At this point, you'll need to enter your license key before you can continue. You should have received this both on the thank you page after your purchase and via email.
Enter it in the box provided:

Then, click “Activate License”.
Run the Getting Started Wizard
The Dashboard page will then load. On the bottom right of that screen, click the button to run the Getting Started Wizard:

On the next screen, click the “Add Level” button:

First, give your WordPress membership level a name. For now, assume this is going to be your main membership. It could be something as simple as “Gold” or something more branded like “Underwater Basket Weaving 101”.
It's up to you, but give it a name.

Next, select the type of membership this will be: Ongoing, Fixed Term or Specific Date. In the majority of cases, you'll select “Ongoing”. Even if, this will be a modular course membership. Fixed Term is used primarily for trial membership levels.
And, Specific Date is a unique kind of setup that is rarely used.
For the final option, you'll most likely leave all these unchecked. This option will automatically give this level access to every page, post, category and comment on the site and will override your individual post settings.
In most cases, you won't want this.
Click the “Next” button.

In most cases, you'll leave all these options unchecked. Although, if you want to have members agree to Terms and Conditions when they join your membership, you can enable that checkbox and enter those terms in the box that will appear.
Once done, click the “Next” button.

On this step, in most cases, you'll check the “Automatically Protect New Pages/Posts” option. This will ensure any new post or page you create is protected by WishList Member. For most standard membership sites, this is what you want.
Next, you'll generally leave the “Only show content for each membership level” option off. This affects posts a member or non-member does NOT have access to. With this off, those posts will still show up on your blog page and in category and tag listings.
But, when the visitor clicks to view them, they'll be taken to an “error” page that tells them they're either not a member OR they don't have access to the proper membership level. Often, these pages will be your sales page and/or membership upgrade page.
Typically, we want visitors clicking on them and being sold on joining or upgrading.
So, we leave this option turned off.
Again, click the “Next” button.
Next is your Email Setup:

This affects the automatic emails WishList Member sends out when a new member registers or resets their password, etc. Enter the “from” information for those emails here. Most of the time, this will already be set to the proper information.
Once you have this set how you want, click “Next”.
Now, it's time to select our integrations:

First, select the Payment Provider you'd like to use to process your payments. If you're brand new and haven't started using one, yet, I recommend you start with PayPal Checkout or Stripe. They're both easy to create accounts, easy to integrate with WishList Member and easy to install the necessary payment buttons and links on your site.
But, feel free to use what you'd like and select it from the dropdown.
Same with the Email Provider. This actually isn't required, however, you'll want to pretty quickly be putting new members onto a mailing list, so you can contact them about new content, new offers, etc.
Aweber and Mailchimp are two of the simpler options.
If you're brand new to this, again, I'd start with one of those.
Once you've selected your options here, click the “Save” button and you're all set. You've configured WishList Member and created your first level. The only thing left to do is…
Configure Your Payment Provider and Email Provider
This, of course, will depend on which providers you've chosen. The setup instructions are a little bit different for each one. However, let me give you some basic instructions to get you going. So, to start, click on the “Integrations” link under the “Setup” menu:

The Payment Provider you selected in the Wizard will be highlighted with a green checkmark. Go ahead and click on it to configure its settings:

As I mentioned, the setup instructions here will be different for each Provider, however, each comes with detailed setup instructions. There will either be a video tutorial or text documentation. You'll see the link for either here:

And, for text documentation it looks like this:

Click that link and walk through the setup to get your provider configured.
And, it's the same for the Email Providers.
But, once you have those configured, you're set up to take payments! We only have a few more steps to go to shore up our membership site. So, let's get into it.
Step #7: Create a Membership Dashboard Page
Your Dashboard page will be the page members get taken to every time they log in. So, the basic idea is to create a page that helps them jump back into your content and your community quickly. And, you have a few options with this.
The simplest approach is to just have this be your “Blog” page.
This is the home page on most blog websites. It lists the latest posts to the site newest to oldest. It will look something like this:

If you're just starting, this is usually the best way to go.
The theme you chose will control this. And, it may have some options to let you edit the layout and look and feel. In our case, using Elementor and OceanWP, we can easily create this page using Elementor's “Posts” widget.
To do that, go to Pages > Add New:

Just give it the name, “Home” and publish it with no content:

Then, click the “Edit With Elementor” button:

On the left-hand side, drag and drop the “Posts” widget into the “widget area”:

You will need Elementor Pro to have access to the “Post” element.
From here, you can configure the look and feel however you'd like. I recommend you spend some time playing around with the settings. You'll find Elementor is a breeze to use and, once you see what you can do, building pages starts to become fun:

Once you have it looking how you'd like, be sure to click the “Update” button:

Next, we need to set this page as our home page AND after login page. To do that, we'll head to Settings > Reading in WordPress:

On this screen, under “Your homepage displays”, select the “A static page” option. Then, select the “Home” page we just created from the dropdown menu and click “Save Changes”:

Next, go to WishList Member > Advanced Options > Global Defaults and select the “Redirects” tab. Then, click the “Configure” button next to “After Login”:

In the pop-up that appears, select the “Page” option and, again, choose our “Home” page from the dropdown menu that appears:

Then, click “Save and Close”.
That's it. Your Dashboard page is now done!
Step #8: Create a Sales Page
Next, you need to create your sales page. This step is a bit tricky, because it's highly dependent on your site and your niche, etc. But, let me give you a guideline we've used for numerous membership sites that works well:
Summarize the Offer Above the Fold
Above the fold refers to what you see when you land on a web page without scrolling. It's the one part of your page you can guarantee a visitor will see. So, you want to summarize your offer and include a “buy now” button.
Here's what that looks like for our very own membership site, WishList Insider:

Membership Features
Next, you'll simply lay out the “features” of your membership site. The actual “stuff” members will get. We typically bucket this into three main categories: Training, Resources and Community. Again, here's an example of our Training section on our sales page:

And, we have similar sections for Resources and Community.
Pricing
Next up is your Pricing section. We always use a pricing table and re-state the entire offer here. It's a pretty straight-forward section. Here's what ours looks like (I shrank the screenshot in order to fit it all in):

Buy Now Button
Next, we'll add in our “Buy Now” button. This is one of the places where we “tie” our membership site together. That's because the button you place here needs to be from the payment provider you integrated your site with AND for the membership level you're selling on this particular sales page.
Fortunately, with WishList Member, it's very simple.
In the WordPress page where you're creating your sales page, start typing (without the quotes) “/classic”. You'll see a dialog appear for the Classic block:

Click on the icon to insert a Classic block into your page. Once the Classic block loads, click on the blue WishList Member icon. Then, select Integrations > Your Integration. For this tutorial, I'll assume you're using PayPal Checkout, but the process is similar no matter what payment provider you're using:

A pop-up will appear. Select the Membership Level, Button Type and Button Size you'd like. You can use the built-in buttons for that particular payment provider, upload your own image or use a plain text button.
Once you've set your options how you'd like, click “Insert Mergecode”:

This will insert the proper mergecode into your post to display your “Buy Now” button. And, you're all set. People can now click that button and purchase your membership!

Here's an example from our sales page from WishList Insider:

Guarantee
Finally, for our sales page, is the Guarantee. The idea here is to reassure a potential member that if they don't like something, they can get their money back. This doesn't need to be anything fancy. Just make sure you honor whatever you say here.
Here's our gurantee:

That's it! Your sales page is now done.
Step #9: Create Admin Pages
Next, we need to create a few admin pages to handle some of the different scenarios our members might encounter when using our site. Depending on your setup, you'll need more or less of these kinds of pages, but these are the must-haves:
- Non-Members Error Page
- Membership Cancelled Page
- After Registration Page
The nice thing here is WishList Member handles most of the work for us. So, head to WishList Member > Advanced Options > Global Defaults and then select the “Error Pages” tab. Here you'll see a list of potential error pages to configure:

You only need to configure the Wrong Membership Level error page if you have more than one membership level. For now, we don't so we'll skip it. Likewise, you only need the “Membership Expired” level if you're running a trial membership with a fixed term.
We don't, so we'll skip it, as well.
But, just remember if you add more levels and/or create a trial membership later on, you'll want to come back and configure these pages. Now, as I mentioned, WishList Member does most of the work on these pages for us.
So, click the “Configure” button next to the Non-Members option.
In the pop-up that appears, you'll see this:

We're going to stick with the “Message” option. With that option, WishList Member will auto-create the page for us and embed the message we specify into it. You can create a separate WordPress page if you'd like and select it under the “Page” option.
But, we'll keep it simple.
So, for this page, edit the message in the editor provided to fit your membership site. Two things to keep in mind here.
First, this is a “Non-Members” error page. So, this is where people will get redirected if they try to access protected content but 1) aren't a member or 2) are a member, but not logged in. So, you want to account for both scenarios here.
The [wlm_loginform] shortcode you see will insert a login form for you. So, that part is mostly taken care of. Maybe, just tweak the text above it to your liking. But, you'll also want to include a section here where you tell people where to go if they're not a member.
And, include a link to your sales page.
We, also, often include a link to support on this page. Just in case someone is having login issues or needs to contact support for some reason. It's right here, easy for them to find. Here's an example from a site we recently helped build:

The final page we need to create is our After Registration page. This is the page new members will see immediately after registering to our membership level. The main thing here is to give them the link to our Dashboard page so they can access our site's content.
But, you can include a welcome video or other “onboarding” materials if you'd like. For our purposes here, we're going to keep this simple. Go to WishList Member > Advanced Options > Global Defaults > Redirects and click on the “Configure” button for After Registration:

We'll stick with the “Message” option and we'll include a simple message with a link to our Dashboard page. So, something like this:

The shortcode [wlm_memberlevel] will insert the name of the membership level they joined. You can leave this as-is or simply remove it and put the name of your membership level in directly — if your level name isn't something that you want to display publicly.
Here's the text of that message if you want to copy it. Just be sure to change the link so it links to your actual Dashboard page and change out [YOUR NAME} with your name.
Hey [wlm_firstname]!

Thanks for joining our [wlm_memberlevel] membership! Your account has been created and you now have access to all the content you signed up for. To get access to that content, visit our Dashboard page here.

Again, welcome aboard and we look forward to hearing from you.

All the best,

[YOUR NAME}
Click “Save and Close” and you're done.
You've created your admin AND your membership site. Yep, that's it. Obviously, there's more you could dive into and you could add more memberships and so forth. But, you can start posting content and selling memberships at this point.
So, huge pat on the back. You did it!
Conclusion
Certainly, there's a few more things to be done like creating your membership content, promoting your membership and so forth, but we'll save those for another post. Getting to this point is a huge step. You're officially open for business. Your membership site is built and that's the biggest hurdle to get across. So, congratulations!
