The courses add-on in CourseCure puts the power into your hands to easily create and manage courses on your site. You can build a new and functioning course in a matter of minutes and tailor it to fit your needs. You also have the option to incorporate additional CourseCure add-ons into your courses like quizzes, points and badges.
You can check out the general settings in the Courses > Settings section in CourseCure. This provides you with a central area to adjust settings related to the layout, style and more.

—
This article includes examples of the following settings for courses within CourseCure. You will see a tab for each of these settings in the Courses section.

—
General Course Settings
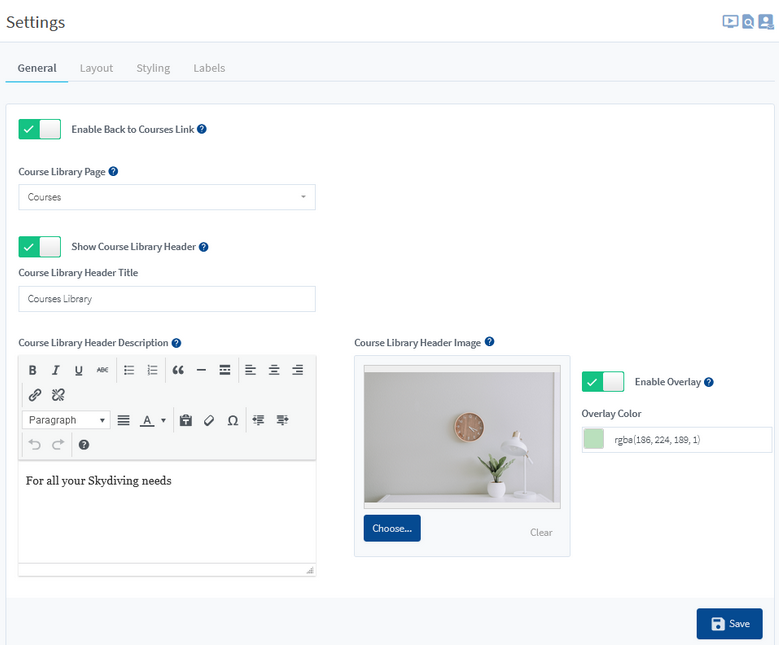
General settings related to the Course Library Header, Course Library Header Image and more can be adjusted in the General tab. You can check out the additional info for each setting below the screenshot.

—
Enable Back to Courses Link. If enabled, a clickable “Back to Courses” link will be displayed on the courses page.

—
Course Library Page. A dropdown is used to set the page that will display the list of courses on the site. This dropdown is populated with the available pages on the site.

—
Show Course Library Header. If enabled, the Course Library Header will be displayed on the Course Library page. You can select a header image, header description and more using the additional settings that appear if this setting is enabled.

—
Course Library Title. Set the title that will appear in the Course Library Header.

—
Course Library Header Description. Use the provided editor to include a brief excerpt describing the course. The Library Header Description will accept formatting when using the editor.

—
Course Library Header Image. Allows for an image to be uploaded and set as the header image for the Course Library section. The recommended image size is 1024×768 pixels.

—
Enable Overlay and Overlay Color. If enabled, the Overlay Color picker is displayed and can be used to set a color overlay that is applied to the Library Header Image.

—
The blue Save button on the bottom right can be clicked to save all configured settings.

—
Course Layout
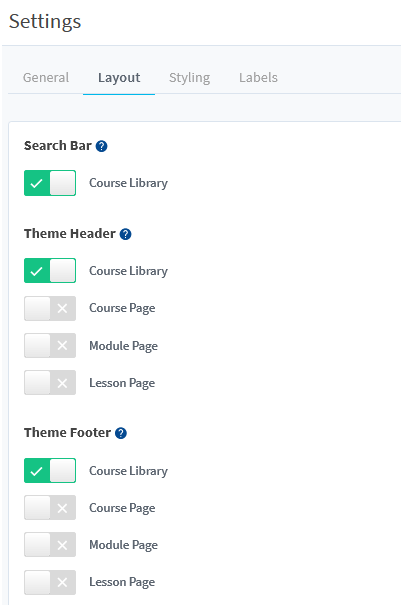
Layout settings related to the Search Bar, Theme Header and Theme Footer can be adjusted in the Layout tab. More details about each setting are provided below the screenshot.

—
Search Bar. If enabled, a search bar will be displayed on the page set as the Course Library page. Users can use this search bar to search the contents of the courses.

—
Theme Header. If enabled, the site Theme Header will be displayed on the selected pages. This includes the site theme header, logo, menu, etc. The example screenshot below shows the Theme Header will only be displayed on the Course Library page and not displayed on the Course Page, Module Page or Lesson Page.

—
Theme Footer. If enabled, the site Theme Footer will be displayed on the selected pages. This includes the site theme header, logo, menu, etc. The example screenshot below shows the Theme Footer will only be displayed on the Course Library page and not displayed on the Course Page, Module Page or Lesson Page.

—
Course Styling
Styling settings related to selecting a template and a color palette can be adjusted in the Styling tab. More info for each setting is available below the screenshot.

—
You can select a template from the provided default templates and then choose a color palette. The selected template and color palette will be applied to the courses section of your site once you select them. A message stating “Template Selected” and “Palette Selected” will be displayed when you make your selections.

—
You also have the option to create a new color palette by cloning an existing color palette and adjusting the color options. Mousing over an existing color palette will display the Clone Palette button.

—
Clicking the Clone Palette button will display the Create New Palette popup. You can set the desired name for the new palette and you can set the various color options. This allows you to get creative and select custom colors to be applied to your course template.

—
Below are two example screenshots of how Template 01 and Template 02 appear on a live site. Both templates have Color Palette 03 applied. You can choose your preferred template and apply it to your courses section within a few seconds.
Template 01 Example

—
Template 02 Example

—
Additional information regarding templates and color palettes is available in the Courses – Styling article.
—
Course Labels
The settings previously available in the Labels section are now located in the WordPress Customizer. The label settings can be edited using the individual CourseCure Page Settings for the Course page, Module page and Lesson page when using the WordPress Customizer. This includes text color, label names, button text and more. You can get all the details on how to use these settings to customize your courses (including examples of the options you can adjust and how it will appear on the live site) in this Knowledge base entry.

—
More info on building a Course can be found in the Course Builder article.
More info on setting up Course Protection can be found in the Protect a Course article.
